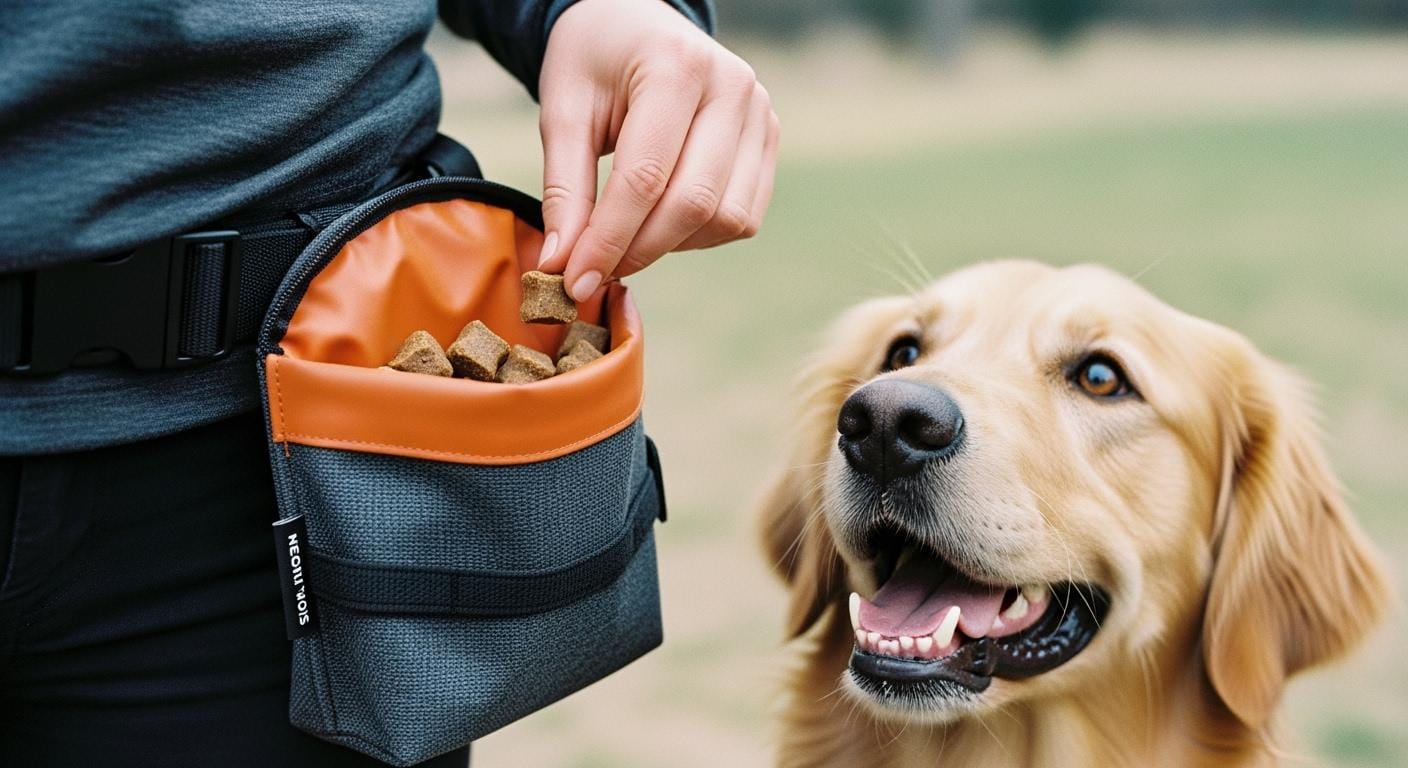
The washable liner is the feature people ask for. It promises easy cleanup after soft treats and oily rewards. But a liner’s real test is what happens during the reach — not after the session. When your hand drops into the pouch and the liner lifts, bunches, or folds over the opening, the washable feature does nothing for the moments that count. A liner that moves during access costs you a beat. In training, that beat is enough for the dog to glance away and miss the marker. The design question is not whether the liner comes out for cleaning. It is whether the liner stays put when you are not cleaning it.
A dedicated treat pouch differs from a pocket or plastic bag not because it holds more treats, but because the access path and spill control are engineered into the structure. When comparing pouch designs against improvised containers, the difference between a smooth session and constant fumbling often traces back to the liner attachment — not the liner material, not the pouch size, but how the liner is held in place during rapid, repeated access.
Why a Washable Liner Can Still Slow Reward Access
The failure starts with how force transfers between your hand and the liner. When you reach into a pouch quickly — as you do during a reinforcement sequence — your fingers create downward pressure while your palm or knuckles drag against the liner wall. If the liner edge is unsecured, that drag creates upward shear. The liner rides your hand like a sleeve. On the way out, it comes with you.
This is not a material problem. It is an attachment problem. The liner floats inside the outer shell, held by nothing more than its own weight and friction against the pouch walls. Both forces collapse under the speed and angle of a typical treat grab. A loose liner does not just slow you down — it changes where your hand lands each time. One reach finds treats at the bottom. The next finds fabric bunched in your palm. Your dog gets the reward a full second later on some tries than others. That inconsistency weakens the reinforcement loop.
A related failure happens at the opening. Flexible liners without a structured rim fold inward when the pouch is partially empty. The opening collapses. You reach in blind, digging through fabric instead of isolating a treat. The distinction between a training pouch and an improvised container is most visible here: a pouch built for fast repetition keeps the access path clear whether it is full or down to the last few pieces.
In practice: The drag-failure cascade — unsecured liner edge meets fast downward hand → upward shear lifts liner → liner bunches at opening → access blocked → reward delayed → dog loses focus — is the most common complaint that traces back to a design choice, not user error.
Soft treats make the problem worse. Oily residue coats the liner surface and increases friction between your hand and the liner wall. A surface that was slightly grippy becomes sticky. The liner lifts more readily. Crumbs compound this — they lodge between the liner and outer shell, creating uneven pressure points that tilt the liner. Each successive reach works against a liner that has shifted a little more from its original position.
| Failure Signal | Likely Liner Design Cause | Better Design Direction |
|---|---|---|
| Liner pulls out with hand | Loose edge or no perimeter attachment | Secured, reinforced liner edges |
| Opening collapses mid-reach | Flexible liner without structured rim | Rigid or spring-frame opening |
| Crumbs trapped in bottom | Sharp corners, deep stitched seams | Smooth, rounded interior |
Where Loose Liners, Corners, and Openings Fail First
Liner Attachment and Edge Control
Edge control dictates whether a liner stays anchored or lifts. In production, liner attachment falls into roughly three approaches. A sewn-in perimeter captures the liner edge in a seam — often with binding tape — so there is no free edge to catch a hand. This is the most controlled approach and the hardest to retrofit. A snap-in rim uses a rigid frame that clips into a channel on the pouch body; it is removable but depends on the snap fit maintaining tension across the full perimeter. A drop-in liner with a folded-over top edge is the simplest to manufacture but the least stable: it relies on gravity and the fold’s friction against the pouch wall, both of which fail under fast hand movement.
To see whether edge control holds up, load the pouch with 10–15 small treats, clip it to your waist, and pull a treat every 2 seconds for one minute. After that minute, check the liner edge. If it has crept up more than half an inch anywhere along the perimeter, the attachment is not secure enough for paced training.
| Failure Signal | Likely Product Cause | Better Design Detail |
|---|---|---|
| Liner pulls out with hand | Loose or weak edge attachment | Reinforced or sewn-in liner edges |
| Sticky residue remains | Textured or high-friction interior | Removable, smooth-surface liner |
| Crumbs stuck in corners | Deep seams or box-shaped bottom | Rounded, seamless interior |
Bottom Shape, Interior Seams, and Crumb Traps
The second failure zone is the bottom. Box-shaped pouches with stitched bottom seams create corners where crumb-sized debris settles. Soft treat residue — liver paste, cheese-based rewards, moist kibble — packs into these corners under its own weight. Each reach compresses it further. Over a session, residues bond to the seam stitching at a level that a quick wipe cannot reach.
A rounded bottom with a heat-welded or single-piece construction eliminates the corner entirely. Debris has nowhere to settle, so a wipe clears the surface. The manufacturing difference is real: a flat piece sewn into box corners costs less to produce but creates four debris traps. A molded or welded rounded base costs more in tooling but removes the trap geometry. This is one of the places where pouch sizing intersects with treat type — a pouch sized for long sessions with soft treats needs the rounded interior more than a small-capacity pouch used only for dry kibble.
Opening Stiffness and One-Handed Access
Opening stability matters as much as the liner itself. When the opening collapses, you dig instead of grab. The delay is small — half a second, maybe a full second — but it repeats on every reach. A magnetic closure keeps the opening aligned but can trap flexible liner fabric in the seal, creating a partial gap. A drawstring gives adjustable tension but requires two hands to reopen. A rigid rim or spring frame holds the opening shape regardless of how full the pouch is, which matters when treat volume decreases through a session and the pouch walls want to fold inward.
Trainers with smaller hands tend to notice opening instability sooner — a deep pouch with a collapsing opening forces the whole hand inside, where a shallower pouch with a structured rim lets the fingers do the work. The design tradeoff is between capacity and one-handed reliability.
What Liner Design Works Better for Fast Training Sessions
Secured Washable Liners: Fixed, Reinforced, or Integrated
A liner that stays put during repeated access removes the single biggest failure point in treat delivery. Three design approaches accomplish this reliably.
A sewn-in liner with bound edges joins the liner and outer shell at the top seam. Pulling on the liner pulls on the entire pouch body, not just the liner — the force distributes across the seam instead of concentrating at a free edge. A snap-in rigid liner uses a full-perimeter channel: the liner clicks into place and requires deliberate force to remove, so normal hand movement cannot dislodge it. An integrated interior eliminates the separate liner entirely — the pouch body itself is lined, so there is nothing to shift or pull out.
Each approach trades off between cleanability and stability. A sewn-in liner cannot be removed for machine washing but cannot bunch up. A snap-in liner can be removed for deep cleaning but relies on the channel maintaining tension over hundreds of use cycles. An integrated interior is the most stable of all but limits cleaning to surface wiping. The design choice that works depends on whether post-session cleanup speed or in-session access speed matters more for the training style.
| Design Difference | Why It Matters | Main Limitation |
|---|---|---|
| Sewn-in liner with bound edges | Zero movement during access; force distributes across the seam | Cannot be removed for machine washing |
| Snap-in rigid liner with channel | Removable for deep cleaning; stable when engaged | Channel tension can loosen over time |
| Integrated lined interior | Nothing to shift or detach; simplest structure | Surface-wipe only; harder to deep-clean |
| Drop-in liner with folded top | Simple to manufacture; lightweight | Lifts and bunches under fast access |
A well-designed training treat pack anchors the liner so that cleaning convenience does not come at the cost of access speed. The question to ask of any design is whether the liner attachment withstands the speed and angle of a real training reach — not a slow, deliberate reach during an unboxing, but the fast, downward-angled grab that happens when you need the next reward now.
Smooth Interiors and Rounded Bottoms
The interior surface finish does more than make cleaning easier. A smooth, seamless interior reduces friction between your hand and the pouch wall during rapid access. Rough seams or textured liners create drag points that slow your hand. This matters most with small, dry treats — your fingers need to isolate single pieces quickly, and any resistance in the reach adds variability to reward timing.
After a 15-minute session using soft treats, reach into the empty pouch and run a fingertip along the bottom seam or corner. If you feel grit, stickiness, or a film, residue is accumulating in a texture or seam that will be hard to clean without removing the liner entirely. A smooth, one-piece interior will feel dry or only slightly tacky — and one wipe should reset it.
Stable Openings: Drawstring, Magnetic, or Rigid Rim
The opening mechanism interacts with the liner in ways that are easy to miss until a session goes wrong. A magnetic closure works well when the liner is structured — the magnets snap together cleanly. With a flexible drop-in liner, those same magnets can trap the liner fabric between them, leaving a gap that spills treats on the ground. A drawstring avoids this interference but forces a two-handed step into every access cycle. That pause adds up: twenty treats at an extra second per cycle is twenty seconds of dead air across a short session.
| Closure Type | Advantages | Disadvantages |
|---|---|---|
| Magnetic snap | Quick one-handed access; closes on contact | Can trap flexible liner fabric in seal |
| Drawstring | Adjustable tension; full closure | Slower to reopen; often needs two hands |
| Zipper | Full seal against spills | Slowest to operate; can jam with treat dust |
| Hinge/spring frame | Stays open for access; snaps shut | Adds weight; hinge wears over time |
A spill-free training setup depends on the opening and the liner working together. A structured opening paired with a floating liner still fails — the opening stays put but the liner shifts underneath it. The two elements have to match: a rigid opening needs a secured liner, and a flexible opening needs a liner with enough internal structure to hold its own shape.
When a Removable Liner Helps — and When a Fixed Interior Works Better
The choice between a removable liner and a fixed interior depends on what you are cleaning and how fast you need to reset between sessions.
A removable liner makes sense when you use multiple treat types in one outing. You can pre-load liners with different rewards — high-value soft treats in one, lower-value kibble in another — and swap them mid-session without cross-contaminating oils and crumbs. It also lets you fill liners at home and drop them in on the go. Cleaning speed matters as much as access speed when sessions happen back-to-back, and a removable liner that goes in the dishwasher or washing machine resets faster than a fixed interior that needs hand-wiping. A washability checklist for any pouch starts with whether the interior can actually be cleaned between sessions, not just whether it is labeled washable.
But a removable liner only works if it stays put. If the attachment loosens over time — snaps lose tension, channels widen, folds lose friction — the liner becomes the liability described earlier. A fixed, sewn-in interior avoids this failure mode entirely. It cannot shift because it is not separate from the pouch body. The tradeoff is cleaning speed: a fixed interior requires hand-wiping, and deep corners or textured surfaces extend that process.
The conditions where a fixed interior wins: short, frequent sessions with the same treat type; trainers who prioritize access speed over post-session cleanup time; any scenario where the pouch is worn on a belt or waistband where jostling could dislodge a loose liner.
The conditions where a removable liner wins: long outings with multiple treat types; sessions involving oily or crumbly rewards that demand deep cleaning; users who prefer machine-washing over hand-wiping and are willing to check liner tension before each session.
When comparing designs across the category, the liner attachment method — not the liner material or the pouch capacity — is the variable that determines whether a washable liner helps or hurts during actual training.
Disclaimer: The edge-creep test described above assumes a smooth-coated dog where treat timing directly correlates with focus duration. Double-coated or thick-furred breeds may show different reward-timing sensitivity — a half-second delay that distracts a border collie may not register with a breed that processes reinforcement more slowly. The liner-bunching failure mode is most noticeable during high-rate reinforcement sequences where treats are delivered faster than one per 2 seconds. At slower delivery rates, even a loose liner may stay in place between reaches. If the pouch sits at an unusual angle on the handler’s body — for instance with barrel-chested dogs where the handler’s belt position shifts — the liner stability checks described here may not capture every movement pattern.
FAQ
How do you test whether a liner will stay put before using it in training?
Load the pouch with treats, clip it in the position you would wear it, and reach in at training speed 10 times. Watch the liner edge. If it rises at any point along the perimeter, the attachment is not secure enough. This 30-second check catches most edge-control failures before they disrupt a real session.
Do silicone liners solve the bunching problem?
Partially. Silicone is more rigid than fabric, so it resists folding better. But a silicone liner with an unsecured edge still lifts with your hand — the material rigidity helps with collapse at the opening, not with edge anchoring. The attachment method matters more than the liner material.
Can you modify a pouch with a loose liner to make it stay put?
Limited options. Adding hook-and-loop strips between the liner and outer shell can add friction, but the bond tends to separate after repeated access. A few stitches through the liner and outer shell at the top edge create a fixed attachment, though this makes the liner non-removable. Design-level edge control — a sewn-in perimeter or snap-in channel — is not something you can add after the fact.
What makes cleaning harder — the liner material or the seam design?
Seam design. A smooth, non-porous liner material with deep stitched corners still traps residue in those corners. A textured fabric liner with a seamless, rounded bottom releases crumbs more easily than a smooth liner with four box corners. The geometry of the interior determines where debris settles. The material determines how easily it releases from those surfaces once you reach them.
How often should you deep-clean a pouch with a washable liner?
Wipe the interior after every session that used soft or oily treats. A deep clean — removing the liner for machine washing or fully scrubbing a fixed interior — is warranted when you can feel residue with a fingertip after wiping, or when switching between treat types that should not cross-contaminate.