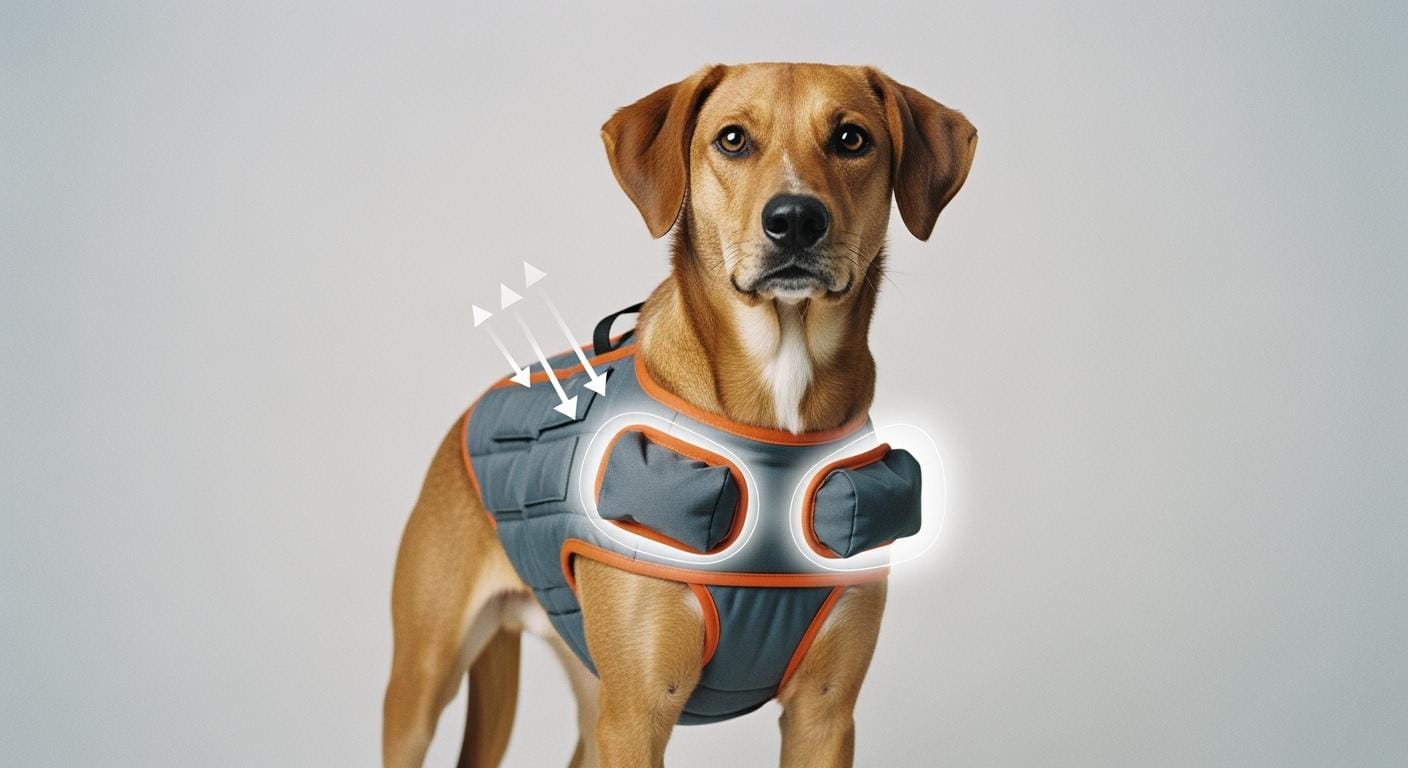
A heavy duty dog harness with metal clips usually feels reassuring the moment you pick it up. The hardware feels solid, the buckles feel more secure, and the whole build suggests it can handle a stronger dog without wearing out quickly. That part is real, but comfort depends on something different. What matters on a real walk is where those clips sit once the dog starts moving.
A clip that looks harmless while the dog is standing still can end up on the shoulder line once the stride opens up. A side clip can slide closer to the ribs than expected. An underarm contact point can start as a small annoyance and turn into repeated rubbing over several walks. The harness only works well when the hardware stays durable and the fit keeps that durability from becoming a pressure problem.
Note: This article focuses on fit, clip placement, and warning signs for a heavy duty dog harness with metal clips during everyday walks. It does not replace veterinary advice when skin damage, limping, or persistent movement changes are involved.
Key Takeaways
- Metal clips usually make more sense for strong or active dogs, but hardware strength does not automatically mean comfort.
- The most important checks are whether clips stay clear of joints, skin folds, and underarm contact zones once the dog is actually moving.
- If the harness keeps rubbing, tapping, drifting, or changing the dog’s stride, the fit or the structure is wrong even if the hardware still looks excellent.
Why Metal Clips Help, and Why Placement Still Matters More
Metal hardware earns its place when the dog pulls hard enough, moves fast enough, or uses the harness often enough that durability really matters. For large dogs, active dogs, and dogs that create repeated leash tension, metal clips usually last better and resist fatigue better than lighter plastic hardware. That extra reliability matters only when the clips stay in the right place.
Strength is useful when the dog actually loads the harness
A calm, low-force dog may not expose the limits of lighter hardware very quickly. A stronger dog usually does. That is where metal clips make practical sense, especially when the harness is part of a daily routine instead of occasional use.
Heavy hardware creates new fit demands
Metal does not flex around the body the way padded fabric does. If a clip lands too close to the shoulder, sits inside an underarm fold, or keeps tapping the same point with every step, the dog will usually feel that long before the owner sees obvious damage.
Durability and comfort have to be checked together
This is why the structure of the harness matters as much as the clip material. Across different dog training harness fit and sizing checks, the most useful hardware is still the hardware that stays away from the dog’s pressure zones once the walk starts.
| Hardware Type | Strength for Pulling Dogs | Weight on Dog | What to Watch | Usually Best For |
|---|---|---|---|---|
| Metal clips throughout | High | Higher | Pressure if clips land near joints or folds | Large, strong, or highly active dogs |
| Plastic clips throughout | Lower | Lighter | Less durable under repeated heavy force | Smaller or calmer dogs |
| Mixed hardware | Moderate to high | Moderate | Different parts may behave differently under load | Everyday use on medium builds |
Tip: Check clip position before tightening the harness fully. If a clip already sits on a pressure zone at rest, it usually gets worse under leash tension, not better.
Where Clip Problems Usually Start on Real Walks
Most clip-related problems show up in a few repeat areas. The tricky part is that a standing check often misses them. A clip can look clear of trouble while the dog is still and land badly as soon as the dog turns, pulls, or lengthens the stride.
The shoulder line is the first place to watch
The shoulder covers more ground during movement than many owners expect. A clip that looks fine when the dog is parked in the hallway can start crowding that arc once the front leg reaches forward repeatedly.
The underarm area is often the most sensitive
The underarm and chest junction can trap contact in a soft, high-friction area. When a metal clip or a stiff strap keeps settling there, rubbing can start faster than owners realize.
Side panel drift can turn a balanced harness into an uneven one
Even a strong harness can become uncomfortable if one side starts carrying more of the load. That often happens when the strap lengths are not truly even or the girth area sits slightly too high or too loose.
Feature design still matters
Padding, contouring, and independent strap adjustment usually matter more with metal hardware than with lighter hardware, because the harness has less forgiveness when the fit is slightly off. That is why heavy duty harness sizing and fit matters before the first full walk, not only after a problem appears.
| Harness Feature | Why It Matters for Clip Placement | Comfort Signal in Use | What to Watch |
|---|---|---|---|
| Chest and strap padding | Spreads contact over a wider area | Dog moves without scratching or slowing | Flattened padding loses protection quickly |
| Ergonomic contouring | Helps clips stay off the shoulder path | Stride looks even and natural | Straight strap layouts may sit poorly on some builds |
| Multi-point adjustment | Lets you shift clip height and angle more precisely | Harness stays centered through turns | Needs rechecking after washing or readjustment |
| Stable metal hardware | Holds position better under repeated load | No rattling or bounce during the walk | Check gates and closure after heavy use |
Clip style also changes how leash tension travels through the harness. Front attachment puts more of that effect toward the chest, while back attachment keeps the connection away from the front panel. The balance between those two becomes clearer once harness and leash matching is judged against how the dog actually moves rather than against the label alone.
How to Check Clip Position Before and After the Walk
The fastest way to avoid a bad heavy-duty setup is to stop treating the standing fit as the full answer. A good harness has to survive movement, not just fastening.
Start with a calm standing check
- Put the harness on while the dog is standing naturally.
- Locate every metal clip before tightening fully.
- Make sure no clip is already sitting under the front leg, on the shoulder line, or inside a chest fold.
- Adjust both sides evenly so the harness stays centered before the dog moves.
Then do a short movement test
- Walk the dog indoors or on a short quiet path for two to three minutes.
- Watch whether the harness drifts, twists, or starts tapping.
- Check whether stride length still looks even on both sides.
- Apply light leash tension briefly and see whether any clip presses more sharply into the body.
Inspect the coat and skin after removal
Check every clip area right after the walk while the coat is still warm. Look for flat spots, redness, repeated warmth, or any underarm contact that looks deeper than normal. On thicker coats, part the fur instead of only scanning the surface. That same early check matters in a durable dog harness weak points checklist because repeated small failures often show up before obvious damage does.
It also helps to track the same setup across at least three walks. Note whether the clip position stayed centered or shifted, whether any tapping happened, whether the dog became resistant to being harnessed, and whether the walk included slowing, scratching, or licking at the harness area.
| Check Item | Pass Signal | Fail Signal | Fix |
|---|---|---|---|
| Clips stay clear of joints | Dog reaches forward normally on both sides | Shortened stride or hesitation | Raise or reposition the strap controlling clip height |
| No clip under the front leg | No redness or flat spots in the underarm area | Hair flattening or irritation there | Loosen and re-center the girth area |
| Harness stays centered | No drift or rotation on turns | Harness pulls consistently to one side | Adjust both sides independently |
| Padding protects contact points | No warmth or irritation under hardware sites | Localized heat or rubbing returns | Add padding or change harness structure |
| No tapping or rattling | Quiet movement throughout the walk | Audible metal movement during stride | Tighten the responsible strap and recheck placement |
Tip: One of the most common mistakes is skipping the short indoor or driveway movement test. A harness can look centered while standing and still become obviously wrong within the first minute of a real walk.
Failure Signs That Mean the Harness Needs Work
A heavy duty dog harness with metal clips usually gives you warning before it causes obvious damage. The earliest signs are often small changes in movement or small signals of irritation that repeat before the skin looks truly bad.
What discomfort usually looks like first
- Repeated scratching or licking at the harness area
- Hair flattening near the same clip site
- Redness or warmth under a clip or strap edge
- A tapping or rattling sound during normal walking
- Harness drift that always happens to the same side
- Dog slowing down or sitting unexpectedly during the walk
Common problems and quick fixes
| Symptom | Likely Cause | Fast Check | Fix |
|---|---|---|---|
| Rubbing or chafing | Clip or strap edge keeps landing on the same contact point | Run your fingers over the warm area after the walk | Reposition the clip path or add padding |
| Hair flattening near a clip | Persistent pressure in one spot | Part the coat after removal | Loosen, center, and recheck instead of tightening more |
| Skin pinch marks | Clip resting into a fold or junction area | Inspect underarm and chest folds carefully | Move hardware away from the fold through strap adjustment |
| Tapping or rattling | Clip is bouncing because it sits loose or off-center | Listen in the first minute of the walk | Tighten and recheck the exact clip position |
| Side pull or drift | Uneven strap tension or poor balance across the harness | Watch the harness from behind as the dog walks away | Reset both sides instead of adjusting only one |
When adjustment is enough, and when replacement makes more sense
Adjustment is usually enough when one clear strap or clip change removes the warning sign and the same problem does not return over the next few walks. Replacement makes more sense when the clip cannot be moved far enough away from the pressure zone, the harness keeps repeating the same rubbing pattern, or the hardware itself starts showing gate problems, deformation, or repeated failure to stay quiet and stable.
Disclaimer: Persistent redness, hair loss, skin breakdown, limping, or any lasting change in how your dog bears weight should be checked by a veterinarian rather than handled as a routine fit issue.
FAQ
Does a heavy duty harness help with training?
It can make leash communication feel steadier by giving you a more stable connection point, but it does not replace actual leash training.
Can a no-pull setup improve control?
Yes, a front attachment can reduce straight-ahead momentum for many dogs, but the control gain only helps when the harness still fits comfortably.
What signs usually show poor comfort first?
Scratching, tapping sounds, harness drift, hair flattening, and sudden slowing are usually the clearest early signs.
A heavy duty dog harness with metal clips is only a good choice when the hardware stays durable without becoming the hardest part of the harness against the dog’s body. Strong clips help. Good placement helps more. Once the hardware stays clear of joints, folds, and repeated rubbing zones, the harness starts doing what it should have done from the beginning: feel secure without making the walk harder on the dog.