Putting a harness on correctly is not only about getting the buckles closed. The real goal is to place the harness so it stays centered, avoids throat pressure, clears the armpits, and does not block normal shoulder movement. Many fit problems start because the harness goes on twisted, the straps are tightened in the wrong order, or the dog is walked before the fit is checked in motion.
This guide explains how to put on a dog harness step by step, how to adjust strap angles after it is on, and how to catch pressure hotspots before they turn into rubbing, coughing, or backing out. If you are comparing styles before fitting one, it also helps to understand the basic differences between common dog harness designs first.
Start with the harness flat, open, and easy to read
Before the harness goes anywhere near the dog, lay it flat and make sure nothing is twisted. A twisted side strap or flipped chest piece can create a bad fit before you even begin adjusting. Open the buckles, identify the chest piece, and check where the leash attachment point should sit once the harness is on.
If the harness goes over the head, the neck opening should be clear and the chest section should hang straight between the front legs once it is placed. If it is a step-in style, the leg openings should sit open and symmetrical on the floor before the dog steps in. This simple pre-check saves time and makes the rest of the fitting process more predictable.
- Untwist all straps before you start.
- Loosen the harness enough to put it on without forcing it.
- Identify the chest section and the leash attachment point first.
- Do not guess orientation after the harness is already half on the dog.
If you are still deciding between overhead, step-in, or Y-front styles, this dog harness selection guide is a better place to compare general type differences before you focus on strap placement.
Put the harness on in the right sequence for the style
The best way to avoid a crooked fit is to follow a simple sequence instead of tightening whichever strap is easiest to reach first. Once the harness is on, the chest section should sit centered and the back attachment point should stay aligned with the dog’s spine.
Overhead harness sequence
- Slip the neck opening over the head without pulling the harness sideways.
- Guide the chest section down so it lies between the front legs.
- Bring the side straps around the ribcage.
- Fasten the buckles behind the front legs.
- Check that the chest strap is below the throat, not pressing into it.
Step-in harness sequence
- Lay the harness open on the floor with both leg openings clear.
- Place each front paw into the correct opening.
- Lift the side panels up evenly.
- Buckle the harness on the back.
- Confirm the chest and belly sections sit flat instead of twisting toward one side.
Adjustment order that usually works best
After the harness is on, adjust it in a sensible order rather than tightening random points. Start with the chest area so it sits low enough to avoid throat pressure. Then set the side straps so they sit behind the front legs with usable armpit clearance. Finish with the belly strap so the harness feels secure without pinching or restricting breathing.
| Adjustment point | What you want | What often goes wrong |
|---|---|---|
| Chest section | Centered and sitting below the throat | Too high, causing neck pressure |
| Side straps | Flat and behind the front legs | Too close to the armpits, causing rubbing |
| Belly strap | Snug enough to prevent backing out | Too loose, allowing rotation or escape |
| Back alignment | Leash point stays centered | Harness shifts toward one shoulder |
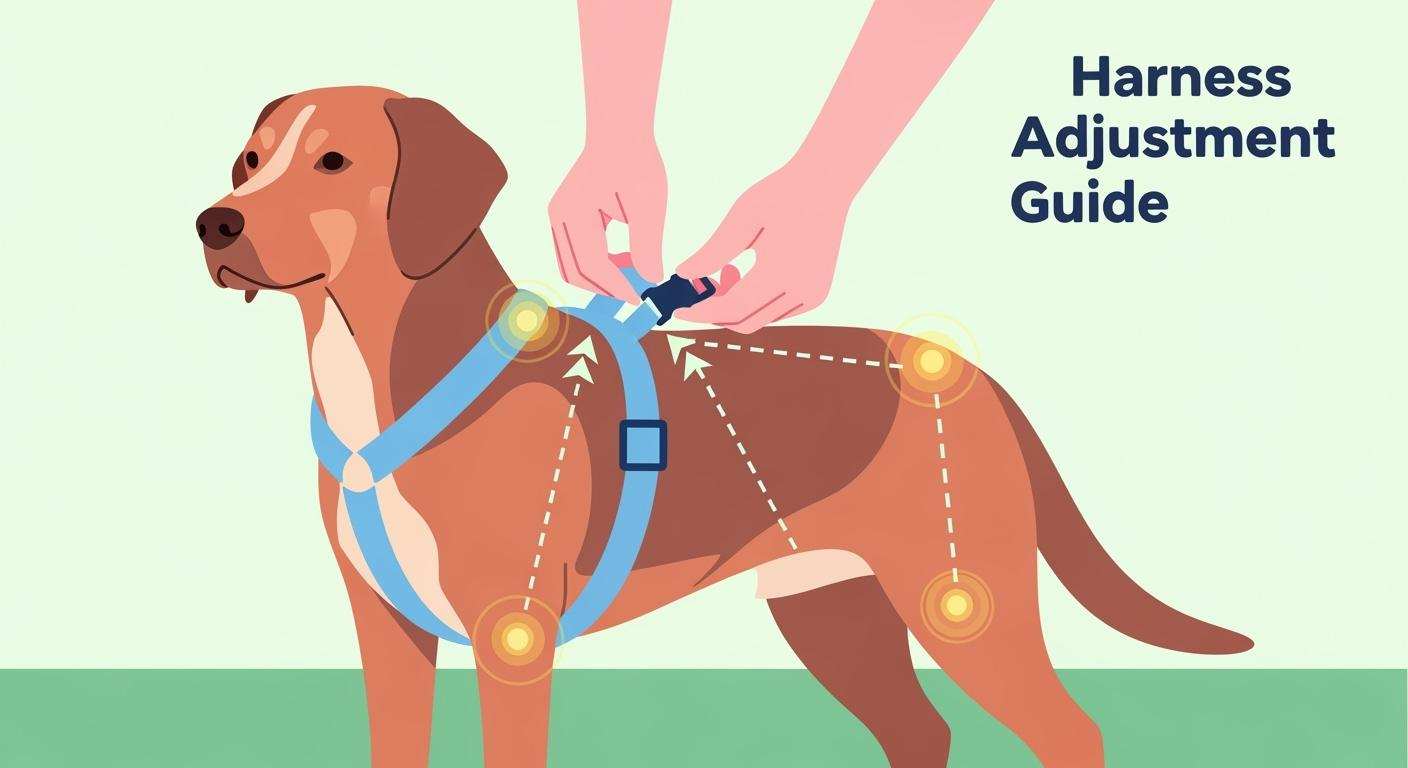
Fix strap angles before they become pressure hotspots
Once the harness is buckled, the next job is to read the strap angles. Many dogs look fine standing still, then show the real fit problem once they take a few steps. The most common hotspots are the throat, the armpits, the front shoulder points, and any buckle that rests too directly on bone.
Chest strap height matters more than many owners expect
The chest section should sit low enough to avoid pressing into the throat when the leash tightens. If it rides up during pulling or turns, lower it and re-check the side straps. A chest strap that sits too high can make even a soft harness feel uncomfortable.
Armpit clearance should be checked in motion, not just at rest
The side straps should sit behind the front legs instead of cutting into the soft underarm area. If you see redness, short steps, or post-walk licking around the armpits, the fit is not good enough yet. Reposition the side straps first, then check whether the belly strap is helping hold the layout in place.
Shoulder freedom is part of fit, not an extra feature
A harness should not cross so far forward that it interferes with the shoulder swing. Watch the dog walk and turn. If the stride shortens, the front assembly may be too close to the shoulder point. Move it back and look again before deciding the harness is the wrong size.
Buckles should not create their own pressure points
Some harnesses fit reasonably well in the straps but still feel wrong because a buckle or join rests on a sensitive area. Run your hand under the buckle zones after a short walk. Heat, pinkness, flattened fur, or persistent licking can all signal a hotspot worth correcting.
| Hotspot area | Warning sign | What to change first |
|---|---|---|
| Throat | Coughing, pawing, pressure at the neck | Lower the chest section and re-center the harness |
| Armpit | Redness, rubbing, short or awkward steps | Move side straps back and re-check belly tension |
| Shoulder | Restricted front-leg movement | Shift the front layout away from the shoulder point |
| Back or buckle area | Pink skin, licking, discomfort after walks | Reposition the harness so hard points sit more cleanly |
Do three quick tests before you trust the fit
A harness is not truly fitted until it passes a few simple checks. These tests do not take long, but they catch most common problems before a normal walk turns into chafing or escape risk.
The two-finger check
Slide two fingers between the harness and the dog at the main contact points. You want snug contact, not pressure that digs in and not slack that lets the harness float around the body.
The movement check
Ask the dog to walk, stop, turn, sit, and take a few more steps. Watch whether the harness stays centered or drifts toward one shoulder. This is often the fastest way to catch bad strap angles that were not obvious when the dog was standing still.
The gentle backward-pressure check
Apply light backward pressure to see whether the dog can start backing out. If the harness shifts too easily, re-check the belly strap and the overall layout before assuming the style is safe enough for normal use.
If you keep fighting the same fit problem, such as repeated slipping or throat pressure, the issue may be the style rather than your adjustment. In that case, this walking and control fit guide can help you decide whether a different harness setup makes more sense for everyday use.
Stop using the harness and reassess the fit if you see coughing, limping, obvious rubbing, repeated escape attempts, or clear reluctance to move normally.
FAQ
How do I know if I put the dog harness on backwards?
The chest piece usually will not sit cleanly between the front legs, the back attachment point may look off-center, and the side straps may twist or land in the wrong place. If the layout looks confusing once it is on the dog, take it off and reset it flat before trying again.
What strap should I tighten first on a dog harness?
Start by positioning the chest section correctly, then adjust the side straps, and finish with the belly strap. This order makes it easier to control pressure and keep the harness centered.
Why does the harness look fine when my dog stands still but wrong when walking?
Because motion reveals drift, rubbing, and shoulder restriction. Always judge harness fit after a short movement test, not only when the dog is standing in one place.
Should the chest strap sit high on the neck?
No. It should sit low enough to avoid throat pressure while still keeping the harness stable. If it rides upward under leash tension, the fit needs to be adjusted.
When should I stop adjusting and try a different harness style?
If the harness keeps rotating, causes repeated throat pressure, rubs at the armpits, or still feels insecure after careful adjustment, a different style may suit the dog’s shape and movement better than more tightening.