Many dogs struggle with harness fit because straps sit in the wrong place or you adjust them in the wrong order. To learn how to put on a dog harness correctly, start by placing the harness so it sits centered on your dog’s chest, then adjust each strap to avoid pressure on the throat or armpits. Always use the two finger fit check at every contact point and make sure the harness does not slide off center during a quick walk. Check for comfort and free movement after each adjustment.
Key Takeaways
Always put the harness in the middle of your dog’s chest first. This helps the harness fit well and keeps your dog comfy on walks.
Use the two finger fit check at every spot the harness touches. This stops too much pressure and keeps your dog from feeling sore.
Change the straps in the right order: chest, then side, then belly. This spreads out the pressure and lowers the chance of rubbing.
Look for signs that your dog is not comfortable, like red skin or trouble moving. Fix the harness right away to keep your dog safe.
Check the harness fit before and after every walk. This helps you find problems early and keeps your dog feeling good.
What a Good Harness Fit Looks Like
Centered Harness During Movement
A good harness fit starts with the harness staying centered on your dog’s chest. You should check the harness after your dog walks, turns, or stops. If the chest area slides toward one shoulder, you need to adjust the straps. The leash attachment point should stay in the middle of your dog’s back. Use the centering rule every time you put on the harness. If you notice the harness rotates or drifts off center, this signals a fit problem.
Tip: Walk your dog in a straight line, then turn and stop. Watch the harness. If it shifts or rotates, check strap tension and layout.
Pressure Distribution, Not Just Looseness
You want the harness to spread pressure across your dog’s body, not just sit loosely. Straps should not dig into the skin or leave marks. Use the two finger fit check at every contact point. You should feel space for two fingers between the harness and your dog’s body, but the harness should not hang loosely. Even pressure helps prevent rubbing and discomfort. If you see flattened fur or pink skin after a walk, adjust the straps.
Pressure Distribution Table
Area | Good Fit | Warning Signs | Quick Fix |
|---|---|---|---|
Chest | Even contact, no sliding | Slides off center | Adjust side straps |
Armpit | Straps behind front leg | Red skin, chafing | Loosen or reposition |
Shoulder | Free movement | Restricted stride | Move straps off shoulder |
Shoulder Freedom Check
Your dog needs to move its front legs freely. Straps should not cross the point of the shoulder. Watch your dog walk and run. If the harness blocks the shoulder or changes your dog’s stride, you need to adjust the fit. Shoulder freedom keeps your dog comfortable and safe. Always check for free movement after every adjustment.
Note: If your dog hesitates to walk or lifts a paw, check the harness for shoulder restriction.
Types of Dog Harnesses and Fit Differences
Picking the right harness type helps you fit it better. Each style has special features and comfort levels. Some harnesses have risks if they do not fit well. Knowing these differences helps you avoid mistakes. Your dog will feel better and safer.
Overhead vs Step-In Harnesses
Overhead harnesses go over your dog’s head. They buckle around the chest. Step-in harnesses let your dog step into two holes. You buckle them on the back. Some dogs do not like things pulled over their heads. Step-in harnesses work better for those dogs. Overhead harnesses give strong control and support. They may not be good for dogs who dislike overhead movement.
Harness Type | Design Description | Comfort Level |
|---|---|---|
Step-in | Dog steps into two leg holes, buckles on back | Even pressure, good for dogs that dislike overhead items |
Overhead | Slides over head, secures at chest and waist | Strong control, may not suit dogs sensitive to overhead gear |
Tip: If your dog does not like harness time, try a step-in style. It can make things easier.
Y Front vs Straight Chest Strap
Y front harnesses have a chest strap shaped like a Y. This protects the trachea and lowers the chance of chafing. Straight chest straps spread pressure well. They might limit movement or rub if not fitted right.
Harness Type | Pressure Distribution | Fit Risks |
|---|---|---|
Y-Harness | Better tracheal protection | Less risk of chafing |
Straight Chest Strap | Solid pressure distribution, less airway protection | May restrict movement, can cause chafing |
Front, Back, and Dual Clip Styles
Harnesses have different leash attachment spots. Front clip harnesses help guide your dog. They can stop pulling but may block shoulder movement if not fitted well. Back clip harnesses are easy to use. They might make pulling worse. Dual clip harnesses give you both choices. Common risks include blocked movement, throat pressure, escape risk, and bad fit that makes pulling worse.
Blocked movement stops your dog’s shoulders from moving well.
Throat pressure can hurt the throat if your dog pulls.
Escape risk goes up if the harness is too loose.
Bad fit can make pulling or discomfort worse.
Harness Type Comparison Table
Harness Type | Easiest For | Common Fit Risk | Quick Fix |
|---|---|---|---|
Step-in | Dogs that dislike overhead | Escape risk | Check belly strap, adjust snugly |
Overhead | Dogs comfortable with gear | Throat pressure | Raise chest strap, check fit |
Y Front | Active dogs, daily walks | Shoulder restriction | Adjust straps behind shoulders |
Straight Chest Strap | Calm walkers | Chafing, movement loss | Loosen chest, check armpit area |
Dual Clip | Training, flexibility | Poor adjustment | Test both clips, re-center fit |
Always check harness fit after every change. Small fixes can help your dog feel much better.
How to Put on a Dog Harness Step by Step
Learning how to put on a dog harness the right way helps your dog stay comfortable and safe. You can avoid common mistakes by following a clear sequence. This step-by-step guide shows you how to put on a dog harness, adjust it for even tension, and check for a good fit every time.
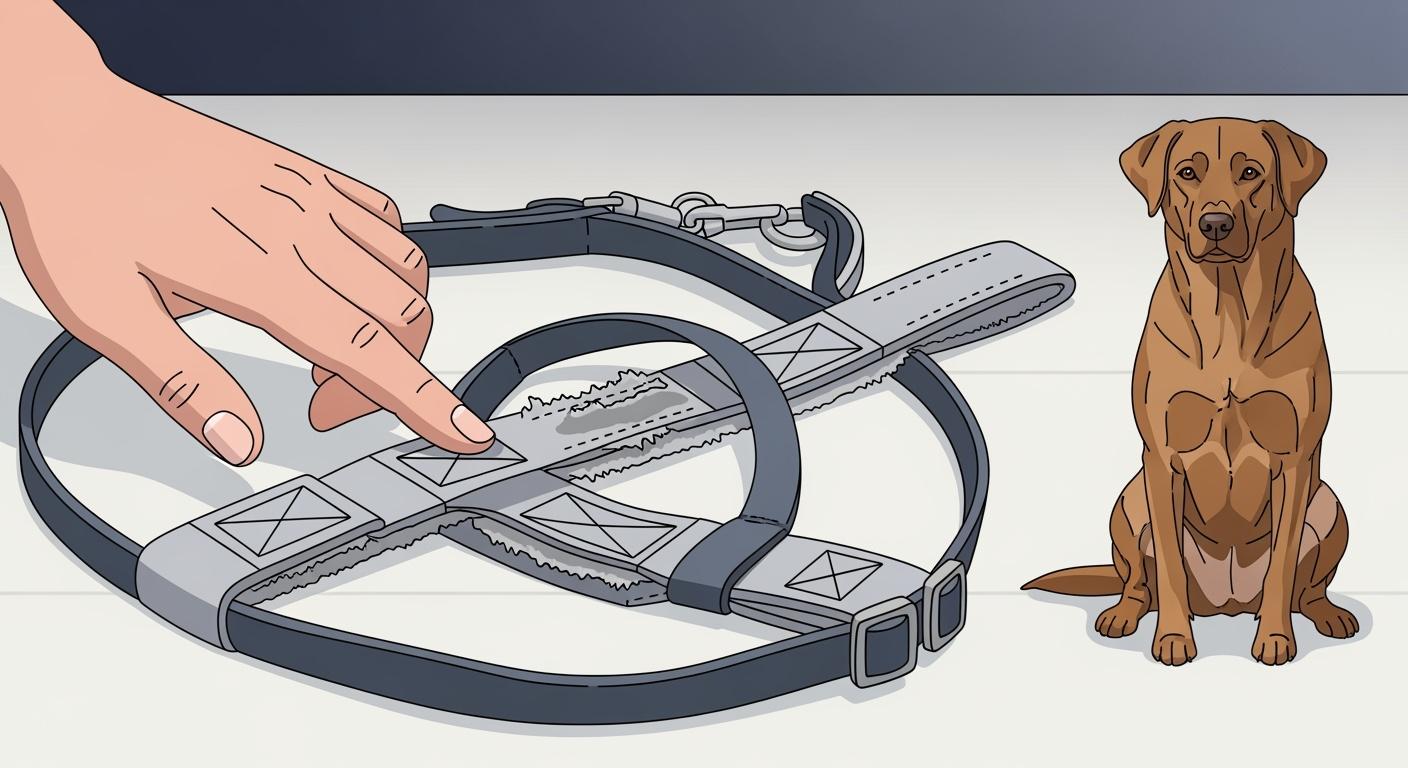
Pre-Check: Untwist Straps and Open Buckles
Before you put on a dog harness, lay it flat and untwist all straps. Open every buckle. Check for any damage or worn spots. Make sure the harness matches your dog’s size by using the supplier’s guide. This step prevents confusion and helps you fit a dog harness without missing any details.
Tip: A twisted strap can cause rubbing or pressure points. Always start with flat, untangled straps.
Overhead Harness Sequence
If you use an overhead harness, follow these steps:
Hold the harness by the top handle or back clip.
Slip the neck opening over your dog’s head.
Pull the chest piece down between the front legs.
Bring the side straps up and around the chest.
Buckle both sides behind the front legs.
Check that the chest strap sits below the throat and above the shoulders.
Watch your dog as you put on the harness. If your dog seems nervous, pause and offer a treat. Never force a scared dog into a harness. This can increase stress and make future fittings harder.
Step-In Harness Sequence
For a step-in harness, use this method:
Lay the harness open on the floor.
Place your dog’s front paws in the correct openings.
Pull the harness up and around the chest.
Buckle the straps on your dog’s back.
Adjust the chest and belly straps so they sit flat and even.
Step-in harnesses work well for dogs who dislike things going over their heads. Always check that each paw is in the right spot before you buckle up.
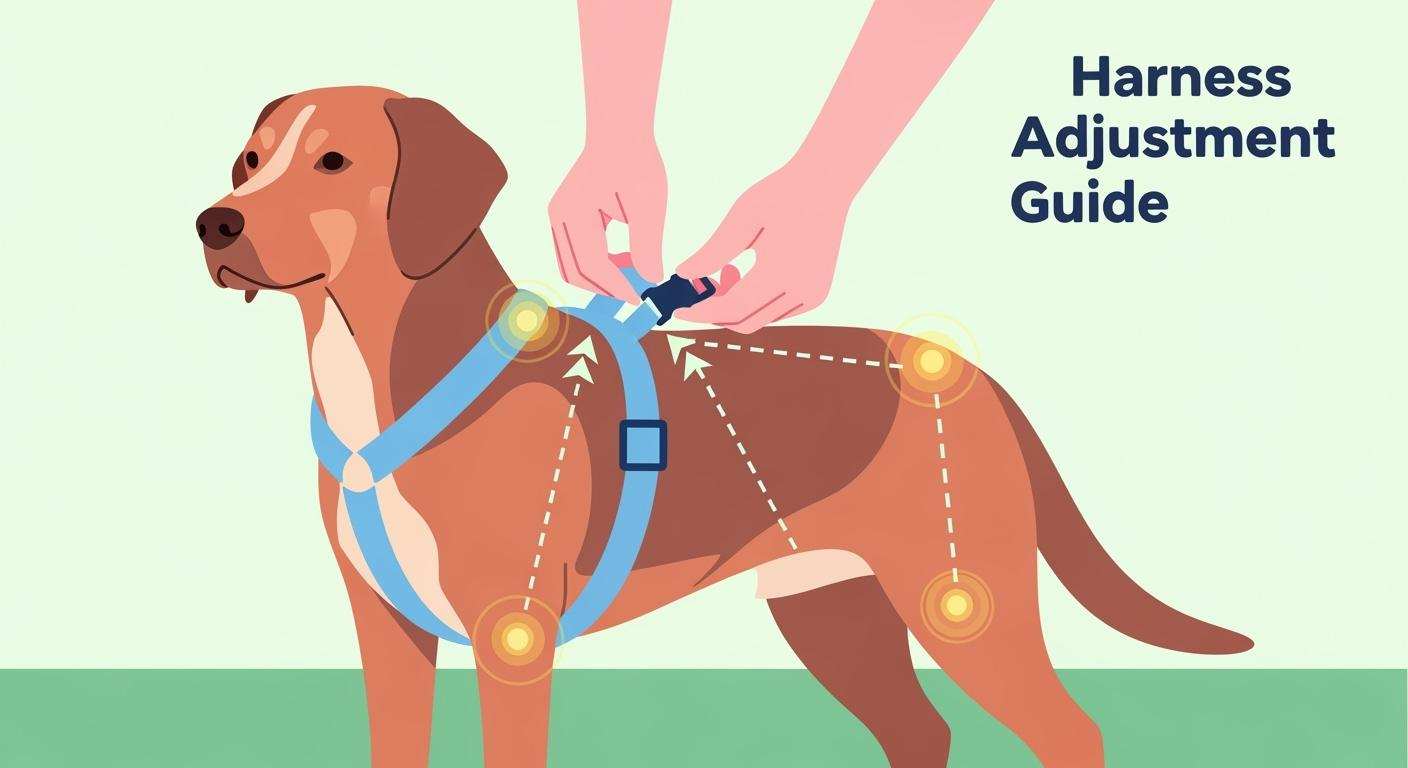
Adjustment Order for Even Tension
To fit a dog harness correctly, adjust the straps in this order:
Start with the chest strap. Make sure it sits below the throat and does not press on the neck.
Adjust the side straps so they sit behind the front legs, not in the armpit.
Tighten the belly strap. It should be snug but not restrict breathing or movement.
Check for symmetry. The harness should look even on both sides and stay centered on the chest.
Note: Adjusting straps in the right order helps spread pressure evenly. This reduces the risk of rubbing and escape.
Numbered Checklist for Every Use
A checklist helps you remember each step and improves fit consistency. Many professionals use checklists to measure, check for skin problems, and record how each product fits. You can use a similar approach at home. Follow this checklist every time you put on a dog harness:
Identify the harness type (overhead or step-in) and untwist all straps.
Put on the harness using the correct sequence for your style.
Adjust straps in this order: chest, side, belly, then check for symmetry.
Run fit tests:
Two finger check at every contact point.
Movement test: walk, sit, down, turn, and watch for strap drift.
Gentle backward pressure test to check for slip risk.
Do a short practice walk. Re-check for strap drift, rubbing, or signs of discomfort.
Look for any skin problems, swelling, or pain after use. Stop if you see limping, repeated escape attempts, or injury.
Write down any fit issues or changes needed for next time.
Safety Reminder: A harness cannot replace training. If your dog shows pain, limps, or tries to escape, stop using the harness and consult a veterinarian or qualified trainer.
By following these steps, you learn how to put on a dog harness with confidence. You also help your dog stay comfortable and safe on every walk.
Strap Angles and Common Fit Mistakes
Getting the strap angles right helps you avoid the most common harness fit mistakes. You can fix problems quickly if you know what to look for and how to adjust each strap. Use these plain language rules to guide your checks.
Chest Strap Height and Throat Pressure
Check the chest strap first. It should sit below your dog’s throat, not press against it. If the strap rides up when your dog pulls, move it lower and adjust the side straps. A poor-fitting harness often presses into the throat, making breathing harder. Always check the chest area after you attach the leash.
Side Straps and Armpit Clearance
Look at the side straps next. They should sit behind the front legs, not cut into the soft armpit area. If you see red skin or your dog licks the armpit after a walk, loosen or reposition the straps. For Scenario A, if your dog has armpit rubbing, adjust the side straps so they clear the armpit, then check again after your next walk.
Belly Strap Placement and Backing Out
The belly strap keeps the harness secure. Place it so it sits snugly behind the ribcage but does not restrict breathing. If your dog backs out or the harness rotates, tighten the belly strap and check the chest strap height. In Scenario B, if your dog slips out or the harness rotates, adjust the belly strap and make sure the leash attachment stays centered.
Tip: Always check for strap drift and rubbing after each walk. Small changes can make a big difference.
Strap Area Table: Good Fit, Warning Signs, Adjustments
Strap Area | What Good Looks Like | Warning Signs | What to Adjust |
|---|---|---|---|
Chest | Below throat, centered | Presses on throat | Lower chest strap, re-center |
Side | Behind front leg, no rub | Red skin, armpit rub | Loosen, reposition straps |
Belly | Snug, not tight | Harness rotates, slips | Tighten belly, check chest |
Shoulder | Free movement | Restricted stride | Move straps off shoulder |
You can solve most fit mistakes by checking each strap area and making small adjustments. Always watch your dog for signs of discomfort and re-check the harness after every walk.
Pressure Hotspots to Watch For
When you fit a harness, you need to check for pressure hotspots. These are areas where straps or buckles can cause discomfort or even a safety issue for dogs. You can spot problems early by watching your dog and checking each hotspot after every walk.
Throat and Neck
Look at the throat and neck area first. If the chest strap sits too high, it can press into the throat. Your dog may cough, pull back, or paw at the harness. This is one of the signs your dog’s harness isn’t fitting right. Move the chest strap lower and make sure you can fit two fingers between the strap and your dog’s neck. Always check this spot when you attach the leash.
If you see your dog gag or stop walking, check the throat area right away.
Armpit and Front Leg
The armpit and front leg region often shows discomfort if the harness rides up or rubs. You may notice redness, hair loss, or your dog licking the area. Straps that dig into the armpit can make your dog hunch or walk strangely. You can fix this by adjusting the belly strap tighter and making sure the chest strap sits behind the front legs.
Common Armpit and Front Leg Issues Table
Issue | Signs to Watch For | Solution |
|---|---|---|
Harness rides up | Straps dig into armpits, dog hunches back | Adjust belly strap tighter; ensure chest strap sits behind front legs |
Chafing or rubbing | Redness, hair loss behind shoulders or underarms | Add soft lining, switch to padded harness, or trim excess fur |
Shoulder Points
Check the shoulder points every time you fit the harness. Straps should not cross the point where the front leg swings forward. If your dog’s stride looks short or stiff, the harness may block shoulder movement. Move the straps off the shoulder and check for free movement. Your dog should walk, run, and turn without hesitation.
Watch for limping or a change in gait. These can signal shoulder pressure.
Spine and Buckle Areas
Buckle and spine areas can cause discomfort if the harness rubs or presses too hard. Look for flattened fur, pink skin, or your dog licking the spot after a walk. Make sure buckles do not sit directly on the spine. Adjust the harness so buckles rest on muscle, not bone.
Tip: After each walk, run your hand along your dog’s back and sides. Feel for heat, swelling, or rough spots.
Hotspot Table: Cause, Effect, Solution
You can use this table to spot and fix pressure hotspots quickly.
Common Cause | What It Leads To | What to Do Next |
|---|---|---|
Chest strap too high | Throat pressure, coughing | Lower chest strap, check two finger fit |
Side straps in armpit | Redness, chafing, hunching | Move straps behind front legs, tighten belly |
Straps cross shoulder point | Restricted stride, limping | Reposition straps off shoulder, check movement |
Buckle on spine | Pink skin, licking, discomfort | Shift buckle to muscle area, check for rubbing |
Harness rotates or slips | Escape risk, uneven pressure | Tighten belly strap, re-center chest area |
You can prevent most problems by checking these hotspots every time you use the harness. If you see any warning signs, adjust the straps and watch your dog’s movement. Quick checks help you keep your dog safe and comfortable.
Quick Fit Tests for Dog Harnesses
You want your dog’s harness to fit well every time. Quick fit tests help you spot problems fast and fix them before your dog feels discomfort. Use these routines each time you put on the harness. You can prevent rubbing, slipping, and escape risks by following these steps.
Two Finger Fit Check
Start with the two finger fit check. Place two fingers between the harness and your dog’s body at every contact point. You should feel a snug fit, but your fingers should not dig into the skin. If the harness feels too tight or too loose, adjust the straps. This test helps you avoid pinching and rubbing.
Tip: Try the two finger check at the chest, belly, and behind the front legs. Repeat after every adjustment.
Movement and Strap Drift Test
Next, watch your dog move. Ask your dog to walk, sit, lie down, and turn. Look at the harness. The chest area should stay centered and not slide toward one shoulder. If the leash attachment point drifts off center, you need to adjust the straps. Movement tests show you if the harness restricts your dog’s stride or causes rubbing.
Walk your dog in a straight line.
Turn and stop.
Watch for harness rotation or strap drift.
If you see the harness shift, check the centering rule and adjust the side or belly straps.
Backward Pressure Slip Test
You want to make sure your dog cannot slip out of the harness. Stand behind your dog and apply gentle backward pressure to the harness. Watch if your dog can pull its shoulders through or back out. If the harness slips off, tighten the belly strap and check the chest strap height. This test helps you prevent escape risks.
Note: Always use light pressure. Never pull hard or scare your dog during this test.
Decision Table: Symptom, Cause, Adjustment, Harness Switch
Use this table to solve common harness fit problems. Find the symptom, check the likely cause, make the fastest adjustment, and decide if you need to switch harness style.
Symptom | Likely Cause | Fastest Adjustment | When to Switch Style |
|---|---|---|---|
Harness rotates or slips | Belly strap too loose | Tighten belly strap | If slipping continues, try step-in harness |
Redness in armpit | Side straps cut into armpit | Loosen or reposition side straps | If redness stays, try Y front harness |
Throat pressure | Chest strap too high | Lower chest strap | If coughing, try Y front or padded style |
Restricted stride | Straps cross shoulder point | Move straps off shoulder | If stride stays short, try harness with open shoulder design |
Dog backs out | Belly strap too loose | Tighten belly and check chest | If escape risk stays, try harness with extra belly strap |
Parameter and Value Table for Fit Checks
Check these key parameters every time you fit your dog’s harness. Use the target range or option to guide your adjustments. Each parameter helps you spot and fix problems quickly.
Parameter | Target Range or Option | Why It Matters |
|---|---|---|
Harness type | overhead or step-in | Changes put-on sequence |
Fit check | two finger rule at contact points | Reduces pinch and rub risk |
Armpit clearance | straps sit behind front leg | Helps prevent chafing |
Chest strap height | avoid throat pressure | Comfort and safer breathing posture |
Shoulder freedom | avoid crossing shoulder point | Reduces restriction risk |
Centering rule | chest stays centered | Flags poor adjustment |
Rotation cue | leash point drifts off center | Flags layout or fit issue |
Movement test | walk, sit, down, turn | Confirms fit in motion |
Backward pressure test | light test for slip risk | Identifies backing-out issues |
Hotspot check | throat, armpit, shoulder, spine | Catches problems early |
Reminder: Run these checks before and after every walk. Small changes can keep your dog safe and comfortable.
You can use these quick fit tests and tables to solve harness fit problems fast. Regular checks help you catch issues early and keep your dog happy on every walk.
Retail Tips to Reduce Harness Returns
Product Page Copy for Fit and Strap Order
You can help customers pick the right harness by making your product page simple and clear. Give easy instructions that show buyers how to measure their dog before buying. Remind them to check the chest, neck, and body length. Tell them why strap order matters when fitting the harness. Show step-by-step pictures or diagrams for both overhead and step-in harnesses. Point out common mistakes, like guessing size by breed or weight only.
List the steps for measuring a dog.
Explain how to do the two finger fit check.
Remind buyers to check strap angles and pressure hotspots.
Suggest taking a short walk before making final changes.
Tip: Clear instructions and pictures help buyers avoid mistakes and lower returns from bad fit.
Size Chart Guidance for Clarity
A good size chart helps buyers find the right harness. Include both weight and measurement ranges. Use clear labels and show both lbs. and kg. Add notes for special cases, like older dogs or breeds with different shapes.
Size | Weight Range (lbs./kg) |
|---|---|
X-Small | 10-25 lbs. / 4.5-11 kg |
Small | 25-45 lbs. / 11-20 kg |
Medium | 45-80 lbs. / 20-36 kg |
Large | 80-125 lbs. / 36-57 kg |
X-Large | 125-225 lbs. / 57-102 kg |
Pick size by total weight and measurements.
If between sizes, choose the smaller one for a snug fit.
Older dogs might need a smaller rear harness.
Some breeds need a bigger front harness.
Note: Tell buyers to measure their dog while standing for best results.
Design Features Buyers Want
Buyers want harnesses that are comfy, safe, and easy to clean. You can point out features that help fit and lower returns.
Feature | Description |
|---|---|
Hip lift support | Helps with lifting and moving |
Full-body design | Gives balanced support |
Multiple adjustment points | Lets you get a custom fit |
Veterinarian recommended | Trusted for safety |
Fear Free Certified | Makes dogs feel comfortable |
Premium materials | Strong and soft |
Machine washable | Easy to wash |
Soft edges and smooth seams stop chafing.
Strong stitching and good hardware make it last longer.
Anti-chafe and breakaway designs add safety.
Tip: Show these features in photos and descriptions. Buyers feel better when they see comfort and safety details.
You can keep your dog safe and comfy by following each harness step. Always look at strap angles and pressure spots before and after walks. Check the harness every month for fraying, broken clips, or squished padding. Most harnesses last one to two years if you use them often. Get a new harness if you find any damage. If your dog seems hurt, has skin issues, or acts scared, talk to a vet or trainer. A harness that fits well lets your dog move freely and helps you enjoy walks together.
FAQ
How do you know if your dog’s harness fits correctly?
You should check for two finger space at every strap. The harness must stay centered during movement. Watch for signs like redness, slipping, or restricted stride. Adjust straps if you see any discomfort.
What should you do if your dog tries to back out of the harness?
Tighten the belly strap and check the chest strap height. Run the backward pressure test. If your dog still escapes, switch to a harness with an extra belly strap.
Can a harness cause injury if fitted wrong?
Yes. Straps pressing on the throat, armpit, or shoulder can cause pain or skin problems. Always check for hotspots after walks. Adjust straps or change harness style if you see warning signs.
How often should you check harness fit?
Check fit before and after every walk. Look for strap drift, rubbing, or skin changes. Dogs grow and change shape, so regular checks help prevent problems.
What is the best way to clean a dog harness?
Remove loose dirt first. Wash the harness in cold water with mild soap. Air dry it. Check for damage before using it again. Machine washable harnesses make cleaning easier.