You want a fast and safe way to carry your dog on a bicycle. You should always think about safety first. Carrying dog on bicycle works best if you check your dog, your bike, and your carrier. This three-step plan helps you not make mistakes. Always use safety steps before carrying dog on bicycle. Make sure your carrier fits your bike well. Check if your dog can stay calm. Stability is important every time you carry dog on bicycle. You must make sure the attachment is tight before carrying dog on bicycle. Watch your dog’s actions and keep them safe on every ride.
Key Takeaways
Always look at your dog, bike, and carrier before you ride. This three-step plan keeps you safe and helps you make fewer mistakes.
Use the three-gate model: see if your dog is calm, check if the bike fits the carrier, and make sure the attachment is tight.
Make sure the carrier is the right size for your dog. If the size is wrong, the ride can be unsafe and accidents can happen.
Check the carrier’s attachment points often. If the carrier is loose, it can shake or fall off, which is not safe for your dog.
Teach your dog to stay calm in the carrier before you go on long rides. Start with short times to help your dog get used to it.
Why Carrying Dog on Bicycle Causes Returns
Stability, Attachment, and Dog Behavior Risks
Staff Note: You want to help customers avoid common mistakes with dogpacking. Most returns happen because of three main risks: stability, attachment, and dog behavior.
When you set up a dogpacking system, you must check for these issues:
Mismatches in bike fit. Some bikes do not have the right mounting points or enough space for a carrier. This can cause the carrier to wobble or not attach at all.
Incorrect pet size for the carrier. If the dog is too big or too small for the carrier, the ride becomes unsafe. The dog may shift, causing the bike to tip or the carrier to move.
Unclear installation instructions. If you skip steps or do not secure all parts, the carrier may loosen during a ride. This leads to rattles, wobble, or even detachment.
Script:
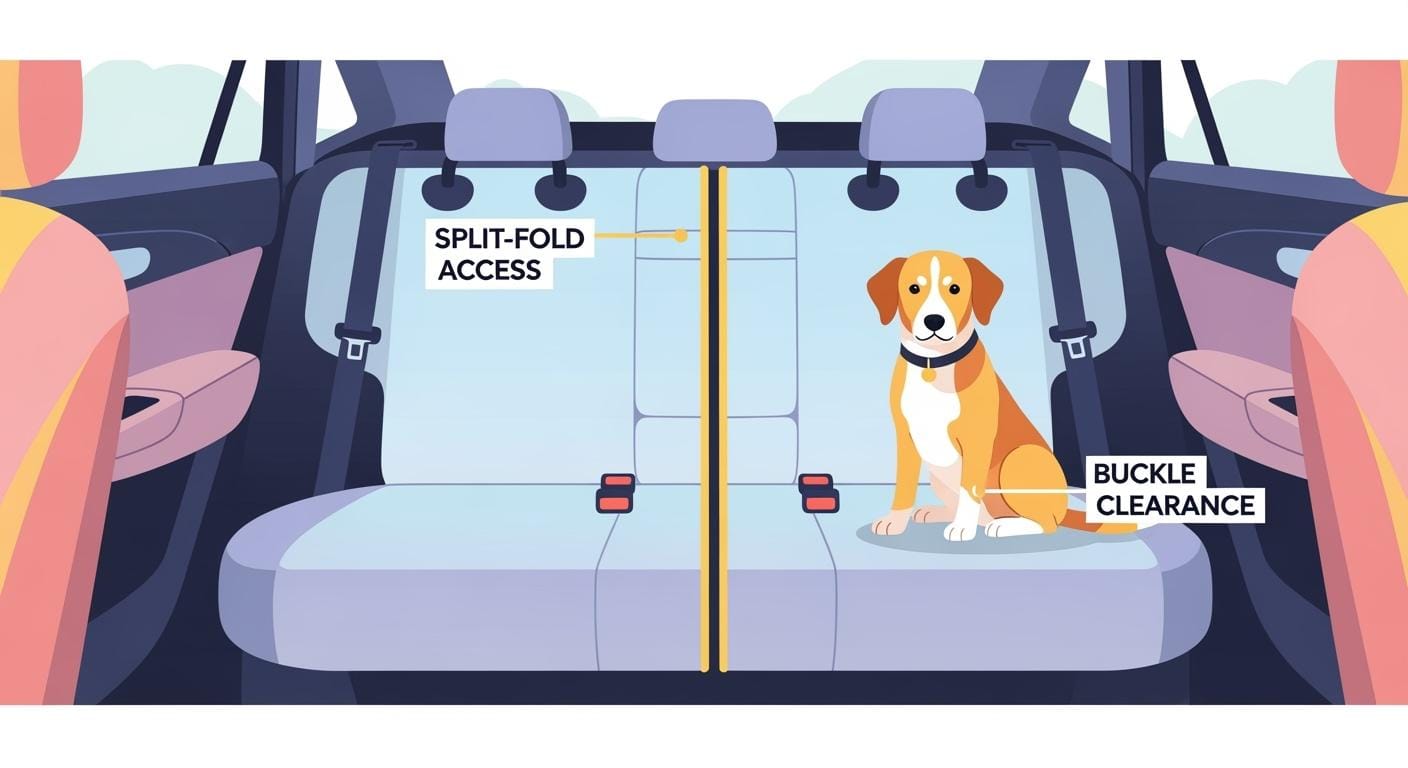
You should always check the center of gravity when setting up dogpacking. If the load sits too high or too far forward, the bike will wobble more. You must keep the carrier low and centered. You should also use a harness-style restraint if the carrier design calls for it. This keeps the dog safe and calm.
Checklist for Staff:
Does the carrier fit the bike mounting points?
Is the dog the right size for the carrier?
Are all attachment points secure and stable?
Is there a secondary retention strap or tether?
Has the customer seen a demo of proper dogpacking setup?
Dog behavior matters in dogpacking. Some dogs panic or try to jump out. You should ask if the dog can stay calm and seated. If not, suggest more training before riding. You want every dogpacking trip to be safe and smooth.
Q&A:
Q: What causes most dogpacking returns?
A: Most returns come from poor bike fit, wrong carrier size, or unclear setup steps.
You can reduce returns by focusing on stability, secure attachment, and dog readiness every time you help a customer with dogpacking.
The Three-Gate Model for Safe Dogpacking
You need a simple way to check if a dogpacking setup is safe. The three-gate model gives you that tool. You look at three things: the dog, the bike, and the carrier. If you check all three, you lower the risk of mistakes and returns.
Staff Note:
Use the three-gate model every time you help a customer with dogpacking. This keeps your advice clear and reduces problems.
Here is what each gate means:
Dog Gate: Is the dog calm and ready to ride?
Bike Gate: Does the bike fit the carrier?
Carrier Gate: Is the attachment secure and stable?
You should always check all three gates before you recommend a setup. If one gate fails, you should not move forward.
Tip:
Teach every staff member to use this model. It helps you give the same advice every time.
Plain-English Definitions Table
Term | What It Means |
|---|---|
Center of gravity | Where the weight sits on the bike. Lower and centered is safer. |
Stability | How well the bike resists tipping or wobbling when the dog moves. |
Attachment | How the carrier connects to the bike. It must stay secure over time. |
Secondary retention | A backup strap or tether that holds if the main attachment loosens. |
OEM and ODM Explained
If you work with suppliers, you may see the terms OEM and ODM. OEM means “Original Equipment Manufacturer.” This is when you sell a product made by another company, sometimes with your logo. ODM means “Original Design Manufacturer.” This is when you work with a supplier to create a new product design for your store. Both models help you offer more choices in your shop.
Dog Gate: Is Your Dog Ready?
You must check if the dog is ready for dogpacking. Not every dog can ride in a carrier. Some dogs get scared or try to jump out. Others stay calm and sit still.
Script:
Ask the customer, “Has your dog ridden in a carrier before? Can your dog stay seated and calm during a ride?”
If the answer is no, suggest a test at home. The dog should sit in the carrier on the ground first. If the dog stays calm, you can move to a short ride.
Checklist:
The dog fits inside the carrier.
The dog does not panic or bark.
The dog can wear a harness if needed.
If the dog fails any step, you should not recommend dogpacking yet.
Bike Gate: Is Your Bike Compatible?
You need to check if the bike matches the carrier. Not every bike works with every carrier. Some bikes have special frames or no mounting points.
Staff Notes:
Look for racks, mounting holes, or enough space for the carrier.
Check the weight limit for both the bike and the carrier.
Make sure the carrier does not block brakes or gears.
Script:
Say, “Let me check your bike for mounting points and space. We want the carrier to sit low and centered for better stability.”
Q&A:
Q: What if the carrier does not fit the bike?
A: Suggest a different carrier or a trailer. Never force a fit.
Checklist:
The bike has the right mounting points.
The carrier sits low and centered.
Nothing blocks the brakes or gears.
Carrier Gate: Is the Attachment Secure?
You must check the attachment every time. A loose carrier can cause wobble or even fall off. Secure does not mean “tight once.” It means the carrier stays secure over time, even with bumps.
Script:
Say, “Let’s check the attachment. We want no wobble, and we always use a backup strap or tether.”
Checklist:
All bolts and straps are tight.
The carrier does not rotate or shift.
There is a secondary retention strap or tether.
Staff Note:
Always show the customer how to check the attachment. This prevents most dogpacking returns.
You should use the three-gate model for every dogpacking setup. This keeps your customers safe and happy. It also lowers the chance of returns and service issues.
3-Minute Store Script for Carrying Dog on Bicycle
Opening: Set Expectations
Say: “Welcome to StridePaw dogpacking gear. You want your dog carried safely every ride. Let’s set clear expectations before you choose a carrier.”
Show: The three-gate model sign. Point to each gate as you explain.
Ask: “Has your dog ridden in a carrier before? Is your bike ready for a carrier? Do you know how to check the attachment?”
Staff Note:
Many customers believe they can just set up the carrier and forget about it. You need to explain that regular checks keep rides safe.
Here is a table of common misconceptions you should address:
Misconception | Explanation |
|---|---|
Customers expect ‘set it and forget it.’ | Many returns happen because of this expectation. |
Comfort is not a priority for the dog or wearer. | A backpack works best when both the dog and wearer are comfortable; fit and breaks are crucial. |
Dogs can handle long durations without breaks. | Some dogs can, but they often need shorter intervals, more breaks, and careful observation. |
Rushed first experiences are effective. | A rushed first experience often backfires; gradual increases in time are recommended. |
Forcing longer carry times is beneficial. | Forcing longer carry time usually increases stress and makes future use harder. |
Say: “Dogpacking works best when you start slow. Give your dog time to adjust. Take short rides first. Watch for signs of stress. Always check the carrier before each ride.”
Choosing Basket, Rack, or Trailer
Say: “Let’s pick the right carrier for your needs. You have three main options: front basket, rear rack carrier, or trailer.”
Show: Each carrier type. Let the customer touch and lift them.
Tips:
Use the lower of the carrier label and the bike mounting rating for weight limits.
Keep the load low and centered.
Prevent rotation by checking all attachment points.
Ask: “Where do you want your dog to ride? Do you prefer to see your dog in front, or do you want more space with a trailer?”
Staff Notes:
Front baskets work for small, calm dogs.
Rear rack carriers fit medium dogs and keep weight off the handlebars.
Trailers suit larger dogs or longer trips.
Say: “Not every carrier fits every bike. Let’s check your bike for mounting points and space. We want the carrier to sit low and not block brakes or gears.”
Demo: Show Stability and Attachment
Show: How to attach the carrier to a bike. Shake the carrier gently to test for wobble.
Say: “Watch how I check for stability. I make sure the carrier does not twist or shift. I use a backup strap or tether for extra safety.”
Ask: “Can you feel any movement? If you do, we need to adjust the attachment.”
Tips:
Always use a harness-style restraint if the carrier design calls for it.
Never say, ‘This is 100 percent stable’ or ‘escape-proof.’
Show how to check the attachment before every ride.
Say: “If you skip steps or rush, you risk wobble or returns. Take your time with setup. Your dog’s safety comes first.”
Confirm: What to Check Before Sale
Checklist for Staff:
The dog fits inside the carrier and stays calm.
The bike has the right mounting points.
The carrier sits low and centered.
All bolts and straps are tight.
The carrier does not rotate or shift.
There is a secondary retention strap or tether.
The customer knows how to check the attachment.
Ask: “Do you feel confident checking the carrier before each ride? Do you have any questions about dogpacking?”
Say: “Remember, regular checks and short rides help your dog get used to dogpacking. If you follow these tips, you will have fewer problems and more happy rides.”
Q&A:
Q: What causes most dogpacking returns?
A: Poor bike fit, wrong carrier size, unclear setup steps, or skipping safety checks.
Say: “You can always ask us for help. We want every dog carried safely and every customer happy with their dogpacking gear.”
Choosing the Right Carrier for Bikepacking with Your Dog
Selecting the right carrier is key for safe bikepacking with your dog. You want to match the carrier to your dog’s size, your bike, and your riding style. Use this section to guide customers through each option.
When to Use a Front Basket
Front baskets work best for small, calm dogs. You can see your dog during the ride, which helps you monitor their comfort. You should measure your pet while they lay down to make sure the basket fits. Always check that the basket attaches securely to the handlebars and does not block your view or controls.
Use a front basket if:
Your dog weighs under 15 pounds.
You want to keep your dog in sight.
Your bike has strong handlebars and enough space.
Staff Note:
Acclimate your dog to the basket at home before riding. This reduces stress and helps prevent sudden movements.
When to Use a Rear Rack Carrier
Rear rack carriers suit medium-sized dogs and longer rides. They keep the weight off the handlebars, which improves balance. You must check that the rack fits your bike and supports the combined weight of the carrier and your dog.
Advantages | Disadvantages |
|---|---|
A rear-mounted carrier provides better balance for long rides. | It can obstruct your view of your dog. |
Steering remains smooth due to the weight distribution. | Quick maneuvers may become more challenging. |
Choose a rear rack carrier if:
Your dog is too large for a front basket.
Your bike has a sturdy rear rack.
You want smoother steering for bikepacking with your dog.
When a Trailer or Backpack is Best
A bike trailer works well for large dogs or long trips. It attaches to the rear axle or frame, keeping the load low and stable. Trailers offer more space and comfort, but you must check for proper attachment and secondary retention. Backpacks are best for very small dogs and short rides.
Consider a trailer or backpack if:
Your dog is over 25 pounds.
You need extra space or plan longer rides.
Your bike cannot support a rack or basket.
Tip:
Always match the carrier to the lowest weight rating between the bike and the carrier. This prevents overload and reduces returns.
Bikepacking with your dog becomes safer and more enjoyable when you choose the right carrier. Always check fit, attachment, and your dog’s comfort before every ride.
Mounting and Stability Tips for Bicycling with Dogs
Center of Gravity Explained
You need to understand how the center of gravity affects every ride. The center of gravity is where the weight sits on your bike. When you keep the load low and close to the frame, you get better control and stability. If the load sits high or off to one side, the bike can wobble or tip more easily. This matters a lot when bicycling with dogs.
Here is a quick reference:
Center of Gravity Position | Effect on Stability and Handling |
|---|---|
Higher | Increases tipping risk and steering difficulty |
Lower | Provides better weight distribution and stability, reducing wobble and enhancing steering control |
Staff Note:
Always show customers how a lower load improves safety. Remind them that a high or forward load can make bicycling with dogs harder to control.
Preventing Wobble and Rotation
You want every ride to feel steady. Wobble happens when the carrier shifts or rotates. You can prevent this by checking all attachment points before each ride. Make sure the carrier does not move when you shake it gently. Use a backup strap or tether for extra safety.
Checklist:
Keep the carrier low and centered.
Tighten all bolts and straps.
Use a harness-style restraint if the carrier design calls for it.
Add a secondary retention strap or tether.
Tip:
Never say a setup is “100 percent stable.” Always encourage regular checks, especially when bicycling with dogs.
Ensuring Bike Compatibility
You must check if the bike matches the carrier. Not every bike works with every carrier. Look for strong mounting points and enough space for the carrier. Make sure nothing blocks the brakes or gears.
Script:
“Let’s check your bike for mounting points and space. We want the carrier to sit low and not block any controls.”
Q&A:
Q: What if the carrier does not fit?
A: Suggest another carrier or a trailer. Never force a fit.
Staff Note:
Proper mounting and stability checks reduce returns and keep customers safe when bicycling with dogs.
Return-Prevention Checklist for Taking Your Dog Bicycling
Questions to Ask Before Recommending
You want to help your customer choose the right dogpacking setup. Start with these questions:
Has your customer used a carrier with their dog before?
Can the dog stay calm and seated during a ride?
Does the customer know how to check the carrier attachment?
What type of bike does the customer have?
What size and weight is the dog?
Staff Note:
Always ask about the dog’s behavior and the bike’s mounting points. This helps you avoid most returns.
What to Check on the Bike
You need to inspect the bike before recommending any carrier. Use this checklist:
Look for strong mounting points on the frame or rack.
Check that nothing blocks the brakes, gears, or wheels.
Confirm the bike can support the combined weight of the carrier and the dog.
Make sure the bike has enough space for the chosen carrier.
Test for smooth steering and balance with added weight.
Tip:
If the bike does not fit the carrier, suggest a trailer or a different mounting method. Never force a fit.
What to Check on the Carrier
You must inspect the carrier before every sale or restock. Focus on these points:
Check all bolts, straps, and clips for tightness.
Make sure the carrier does not rotate or wobble when attached.
Look for a secondary retention strap or tether.
Inspect for any signs of wear, damage, or missing parts.
Confirm the carrier matches the lowest weight rating between bike and carrier.
Track any defects or claims to spot patterns in returns.
Review your returns process to ensure quick inspection and restocking.
Staff Note:
Always show the customer how to check the carrier at home. This step reduces dogpacking returns and keeps rides safe.
Common Questions About Dogpacking
Will It Wobble or Tip?
You may worry about wobble or tipping when you carry a dog on a bike. This is a common concern in dogpacking. Wobble often happens if the carrier sits too high or off-center. Tipping risk increases if the load shifts or the attachment loosens.
Staff Note:
Always check the center of gravity. Keep the carrier low and centered. Test for movement by gently shaking the carrier before each ride.
Checklist:
Carrier sits low and close to the frame.
All bolts and straps are tight.
Use a backup strap or tether.
If you follow these steps, you lower the risk of wobble and tipping.
Will My Dog Jump Out?
Some dogs may try to jump out, especially if they feel scared or excited. You must use a harness-style restraint if the carrier design calls for it. Never rely on the carrier walls alone.
Script:
“Does your dog stay calm in new places? If not, start with short practice sessions at home. Use a harness and tether every time.”
Tips:
Start with short rides.
Watch your dog for signs of stress.
Never leave your dog unattended in the carrier.
If your dog cannot stay calm, suggest more training before longer rides.
Will It Fit My Bike?
Not every carrier fits every bike. You need to check mounting points, space, and weight limits. Many returns happen because of poor fit.
What to Check | Why It Matters |
|---|---|
Mounting points | Secure attachment |
Space for carrier | No blocked controls or wheels |
Weight rating | Safe for both bike and carrier |
Q&A:
Q: What if the carrier does not fit?
A: Suggest a trailer or another mounting method. Never force a fit.
You can reduce returns and keep rides safe by following these dogpacking checks.
Shop Tips for Dogpacking Gear
Staff Training and Documentation
You need good staff training to stop mistakes and returns. Teach every team member the three-gate model. Use easy scripts and checklists for each sale. Make sure new staff practice with real bikes and carriers before they help customers.
Staff Notes:
Training works best when you show how things work. Show how to check mounting points and fit the carrier. Show how to use secondary retention. Repeat safety steps until everyone feels sure.
Checklist for Training:
Go over the three-gate model with each staff member.
Practice putting the carrier on and taking it off.
Pretend to answer customer questions about fit and safety.
Use a training log to see who finished each step.
Keep clear notes in your shop. Put quick guides near the dogpacking gear. Update scripts and checklists when you find new problems or returns.
Assembly and QC Habits
You must follow strict assembly and quality control (QC) habits. Always check each carrier before you put it out or sell it. Use a step-by-step checklist for assembly. Never skip steps, even if you are in a hurry.
Script:
“Before you sell or show a carrier, check all bolts, straps, and tethers. Shake the carrier to test for wobble. Make sure it fits on a demo bike.”
QC Checklist:
Tighten all bolts and straps.
Test for turning or moving.
Attach secondary retention.
Look for missing or broken parts.
Write down any problems in your QC log.
Ops Note:
You can cut down support tickets by checking fit before every sale. Always match the carrier to the bike and the dog’s size. Careful assembly and regular QC stop most problems before they reach the customer.
Q&A:
Q: How do you stop most dogpacking returns?
A: Train staff, use checklists, and check fit and assembly every time.
You build trust and stop returns when you follow these steps. Safety and getting ready keep your customers happy and your shop working well.
Wrap-Up and Training Consistency
You want every staff member to feel confident when helping customers with dogpacking gear. Consistent training keeps your team ready for any question or situation. When you use the three-gate model and follow the fast floor script, you lower the risk of mistakes and returns.
Staff Note:
Training works best when you repeat key steps and checklists. You should review the three-gate model with new hires and during regular team meetings.
Checklist for Training Consistency:
Review the three-gate model at the start of each season.
Practice the store script with real bikes and carriers.
Use checklists for every sale and assembly.
Update training when you see new return patterns.
You should encourage staff to ask questions and share feedback. When someone finds a new issue or a better way to explain a step, add it to your training notes. This habit helps everyone improve.
Script:
“Let’s go over the three-gate model together. We want to make sure every customer leaves with the right fit and knows how to check their carrier before taking your dog bicycling.”
Tip:
Keep quick guides and checklists near the dogpacking section. This helps staff and customers remember the most important steps.
You build trust with your customers when you show a safety-first approach. Consistent training and clear scripts help your shop stand out. When you focus on preparation and regular checks, you create a better experience for every rider and every dog.
You can help customers do well with dogpacking by using the fast floor script and the three-gate model. Always look at the dog, the bike, and the carrier before you sell anything. Getting ready and following safety steps helps stop mistakes and returns. Remind your team to use checklists and look over all guides before each ride. Keep training up to date by sharing new tips and resources at team meetings. When you focus on safety and teaching, you build trust and make customers happy.
FAQ
How do you know if a dog is ready for a bike ride?
You should watch your dog for calm behavior. Try short sessions in the carrier at home. If your dog stays relaxed and seated, you can start with short rides outside.
What is the safest way to attach a carrier?
You must use all bolts and straps. Always add a secondary retention strap or tether. Test the carrier by shaking it gently. If it moves or rotates, adjust the attachment before riding.
Can you use any bike for dogpacking?
Not every bike works for dogpacking. You need strong mounting points and enough space. Check that nothing blocks the brakes or gears. If the carrier does not fit, try a trailer.
How do you prevent your dog from jumping out?
You should use a harness-style restraint inside the carrier. Start with short rides. Watch your dog for signs of stress. Never leave your dog alone in the carrier.
What should you check before every dogpacking adventure?
Carrier sits low and centered.
All bolts and straps are tight.
Use a backup strap or tether.
Dog stays calm and secure.
Tip: Regular checks keep every dogpacking adventure safe and fun.