Many dog harnesses do not fit right. People often measure the wrong place. Some skip checking the fit. Almost 70% of harness returns happen because of sizing mistakes. Most mistakes are with chest girth or neck opening. If you measure your dog the right way, you will have fewer problems. Your walks will be happier. You will see clear steps for how to put on harness dog. These steps help even if it is your first time. These easy checks help you avoid slipping and rubbing. They also help you avoid extra returns.
Safety note: Correct sizing helps comfort and handling. It cannot promise behavior changes. Stop using the harness if your dog shows pain or limps. Stop if your dog has skin problems or will not move. Ask a veterinarian about pain or movement problems. Ask a trainer about pulling, reactivity, or escape behavior.
Key Takeaways
Measure your dog’s chest girth and neck opening accurately to ensure a proper fit. This helps prevent discomfort and reduces the risk of returns.
Choose a harness style that matches your dog’s preferences and needs. Consider overhead or step-in designs based on your dog’s comfort level.
Regularly check the fit of the harness after putting it on. Look for signs of rubbing or discomfort to keep your dog safe during walks.
Use adjustable straps to fine-tune the fit as your dog grows or changes weight. A snug fit allows for freedom of movement without being too tight.
If your dog is between sizes, opt for the larger size and use the adjusters for a better fit. This helps avoid pinching and ensures comfort.
Harness sizing basics for dogs
Chest girth, neck opening, and adjustment range
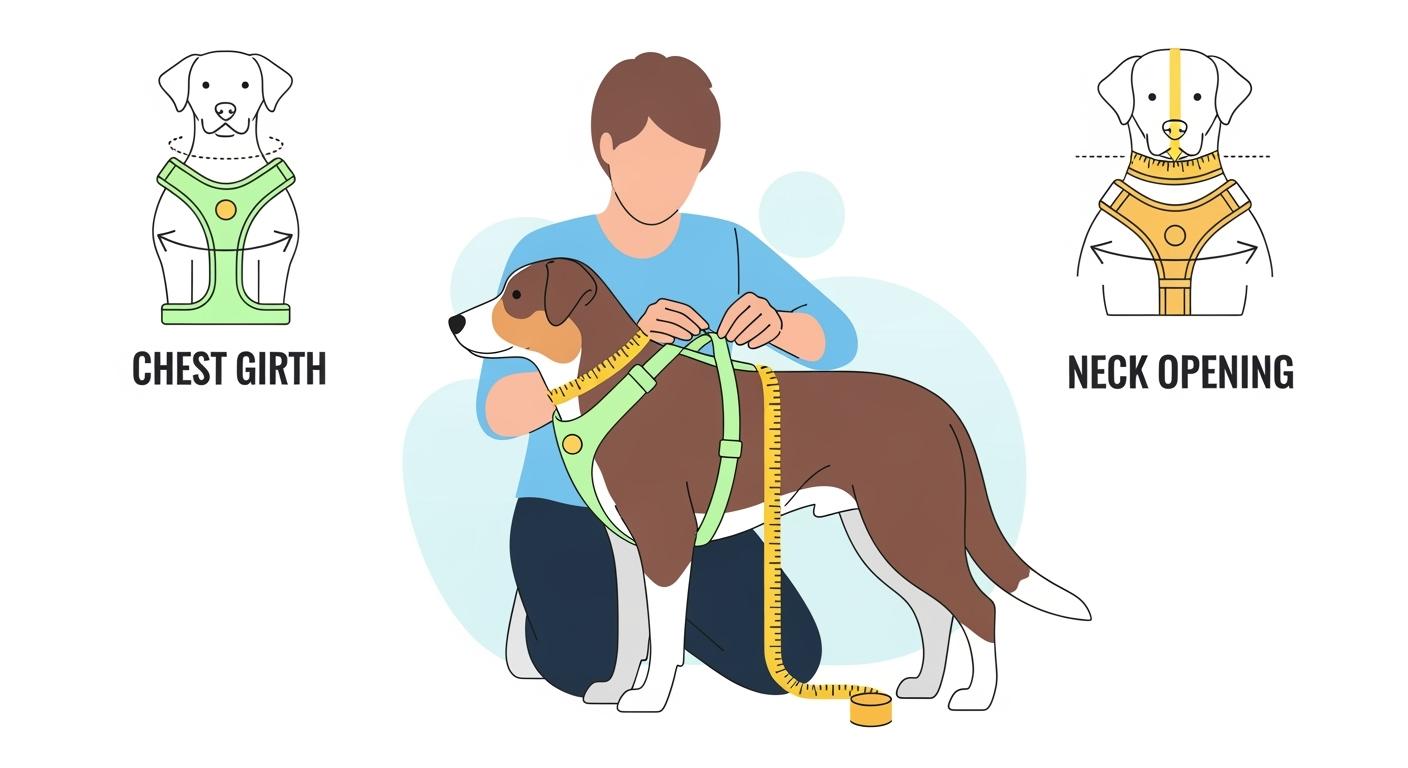
You need to measure your dog’s chest girth and neck opening before you choose the right size harness. Chest girth means the widest part of your dog’s ribcage, just behind the front legs. Use a soft tape and wrap it around this area. Write down the measurement in inches and centimeters, for example, 18 in (46 cm). Neck opening is different from collar size. Measure around the base of the neck where the harness will sit, not high up near the ears. This helps prevent squeezing or escape.
Adjustment range matters when you are choosing the right harness. Straps should have enough room to tighten or loosen so the harness fits your dog’s shape. Look for harnesses where your dog’s measurement sits near the middle of the adjustment range. If your dog has a thick coat, check the fit after brushing to avoid false tightness.
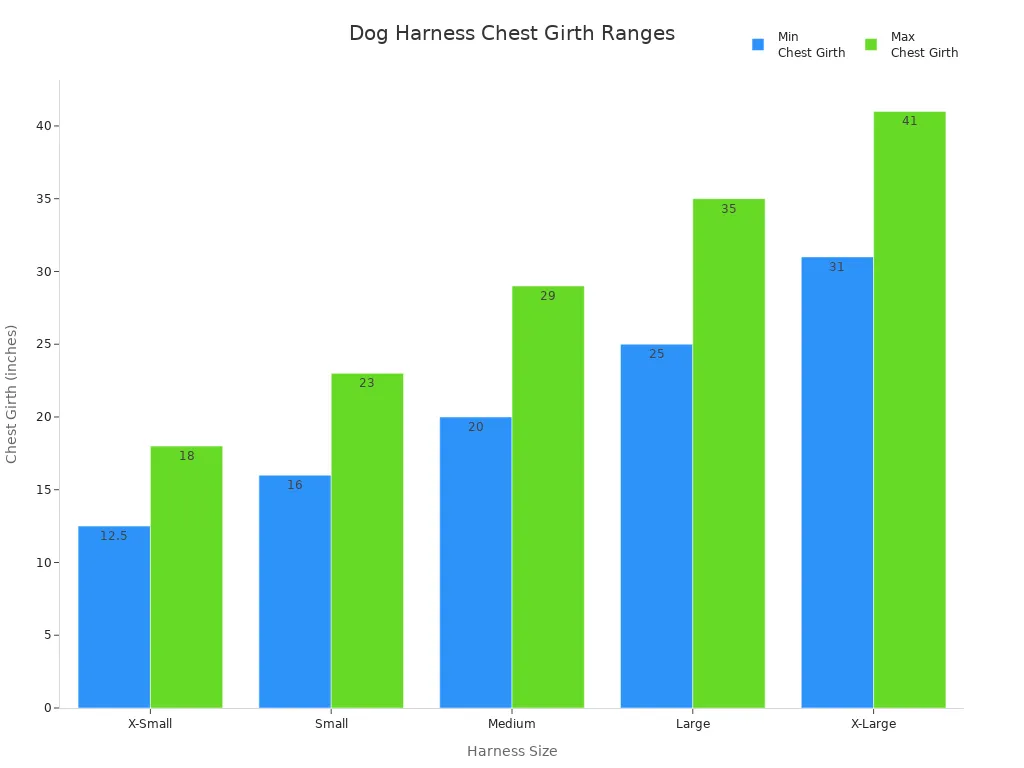
Here is a table showing standard chest girth ranges for popular dog harnesses:
Size | Chest Girth Range | Weight Range |
|---|---|---|
X-Small | 12.5 – 18 in (32 – 46 cm) | 7 – 17 lbs |
Small | 16 – 23 in (41 – 58 cm) | 15 – 27 lbs |
Medium | 20 – 29 in (51 – 74 cm) | 25 – 42 lbs |
Large | 25 – 35 in (64 – 89 cm) | 40 – 60 lbs |
X-Large | 31 – 41 in (79 – 104 cm) | 60 – 80 lbs |
Why harness sizes fit differently
Dog harnesses fit differently because every dog has a unique body shape. Some breeds have deep chests, while others have short necks or thick coats. Accurate chest girth and neck opening measurements help you choose the right size harness. Adjustable straps let you fine-tune the fit, so your dog stays comfortable and safe. A harness should be snug but not tight. Your dog needs freedom to move, especially if they are active.
When a harness is not the best choice
Sometimes, a harness is not the best option for your dog. If your dog pulls hard, a harness may encourage more pulling. Some harnesses give less control or delay communication between you and your dog. In these cases, you can use a flat collar, head halter, or slip lead instead.
Situation | Reason for Not Using Harnesses | Suggested Alternatives |
|---|---|---|
Encouragement of Pulling | Harnesses may allow dogs to pull more easily | Flat collars, head halters, slip leads |
Reduced Control | Harnesses provide less feedback | Flat collars, head halters, slip leads |
Delayed Communication | Pressure is spread out, signals are slower | Flat collars, head halters, slip leads |
Choosing the right harness and knowing when to choose the right size harness helps you avoid common problems and keeps your dog safe.
Harness styles and fit differences
Picking the right harness style helps your dog stay safe and comfy. Each harness style has its own special features. You should choose a harness that fits your dog’s body, how active they are, and how much they like being handled.
Overhead vs step-in harnesses
Overhead harnesses go on by sliding over your dog’s head. You put the harness on the floor first. Then you guide your dog’s head through the neck opening. Next, you fasten the straps. Some dogs do not like things going over their heads. Step-in harnesses let your dog walk into the harness with their front legs. You lift the harness and buckle it around the chest and shoulders. Step-in harnesses are good for dogs who do not like things near their heads or get nervous.
Here is a table that shows the differences between overhead and step-in harnesses:
Feature | Step-In Harness | Overhead Harness |
|---|---|---|
Ease of Use | Easier and faster to put on, no head manipulation | Can be intimidating for some dogs, requires head placement |
Pressure Distribution | Distributes pressure evenly across chest and shoulders | Distributes pressure evenly but can put pressure on neck if not fitted properly |
Control | Less control over upper body and head | Better control, ideal for training larger dogs |
Security | Can be easy to slip out if not adjusted correctly | More secure, encompasses more of the body |
Comfort | Comfortable for small to medium breeds | Comfortable for extended wear, especially for larger breeds |
Risk of Overheating | Lower risk, less coverage | Higher risk due to more coverage |
Tip: Step 2 is picking a harness style that matches how your dog likes to put it on and how you want it to fit. If your dog does not like things over their head, try a step-in harness. If you want more control, overhead harnesses might be better.
Front-clip vs back-clip harnesses
Front-clip harnesses have the leash clip at the chest. This helps you stop your dog from pulling. When your dog pulls, the leash gently turns them toward you. Front-clip harnesses spread pressure on the chest, so the neck does not get hurt. Back-clip harnesses have the leash clip on the back. These are best for calm walks and dogs that already know how to walk nicely. If your dog pulls a lot, a back-clip harness can hurt their neck.
Harness Type | Control Level |
|---|---|
Front-Clip | High |
Back-Clip | Moderate |
Dual-Clip | High |
Y-shape vs H-shape harnesses
Y-shape harnesses let your dog move easily. They are good for active dogs and dogs that pull. Y-shape harnesses might not fit wide-chested dogs well. H-shape harnesses give gentle support and spread pressure evenly. They are good for small or delicate dogs but might make it hard for active dogs to move.
H-Harness Advantages: Even pressure, easy to adjust, safe.
H-Harness Disadvantages: Less movement, can rub skin.
Y-Harness Advantages: Easy movement, comfy, good for pulling.
Y-Harness Disadvantages: Harder to adjust, easier to escape.
Harness type comparison table
Harness Type | Easiest Entry Cue | Best For | Watch-Outs |
|---|---|---|---|
Step-In Harness | Step in with front legs | Nervous dogs, quick fitting | May slip if not adjusted correctly |
Overhead Harness | Over head, buckle chest | Large breeds, training | Head-shy dogs may resist |
Front-Clip Harness | Attach leash at chest | Pullers, training walks | May tangle leash under legs |
Back-Clip Harness | Attach leash at back | Calm, trained dogs | Less control for strong pullers |
Y-Shaped Harness | Overhead, Y front straps | Active dogs, agility, hiking | May not fit broad chests |
H-Shaped Harness | Overhead, H chest straps | Delicate frames, gentle support | May restrict movement |
Dual-Clip Harness | Clip at chest or back | Versatile, training, daily walks | More hardware, heavier |
Dog harnesses come in many types. You should pick the style that fits your dog’s needs and how you want to walk them. The right harness style makes fitting your dog easier and safer.
Measure your dog for a harness

Chest girth measurement method
You need to start harness fitting instructions by measuring your dog’s chest girth. Use a soft tape measure. Wrap it around the widest part of your dog’s ribcage, just behind the front legs. Make sure the tape is snug but not tight. If your dog has thick fur, flatten or brush the coat before measuring. You can use a string if you do not have a tape. Mark the string where it meets, then measure the length with a ruler. Write down the result in inches and centimeters, such as 18 in (46 cm). This step helps you avoid harnesses that rub or slip.
Tip: Always measure from the bottom of the rib cage and avoid the area right behind the armpits.
Neck opening measurement method
You need to measure the neck opening for harness fitting instructions. This is not the same as a collar size. Measure around the base of your dog’s neck, where the harness will sit. Do not measure high up near the ears. Make sure the tape is snug but leaves room for comfort. If you use a string, follow the same marking and measuring steps. This helps prevent squeezing or escape.
Measure the chest girth at the widest part.
Measure the neck circumference at the base for harnesses.
Make sure both measurements allow for movement and comfort.
Using brand sizing charts
Most dog harnesses use sizing charts with dual units. You will see chest girth and neck opening listed in inches and centimeters. Look for your dog’s measurements in the middle of the adjustment range. Adjustable straps help you get a better fit. If your dog is between sizes, choose the larger size and use the adjusters. Check for enough clearance behind the elbows and at the shoulders.
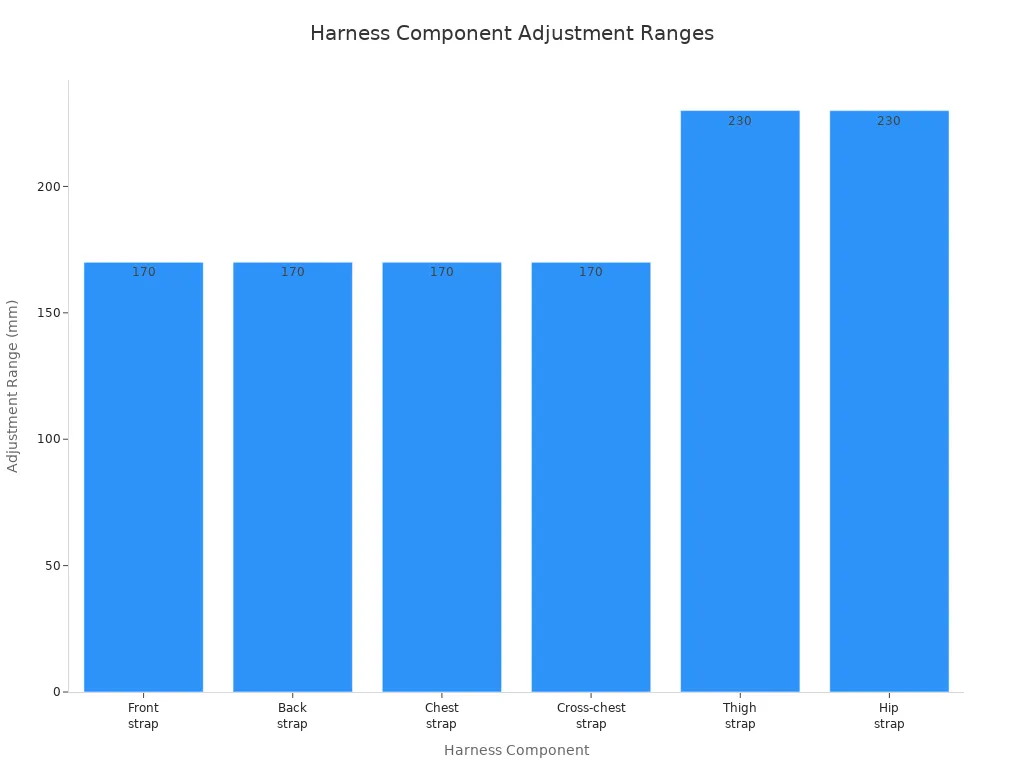
Measurement Component | Adjustment Range (mm) | Size Categories |
|---|---|---|
Front strap | 170 | 0.9, 1.6, 2.5, 3.5 / 0.3, 0.9, 2.0, 3.0 |
Back strap | 170 | 0.9, 1.6, 2.5, 3.5 / 0.3, 0.9, 2.0, 3.0 |
Chest strap | 170 | 0.9, 1.6, 2.5, 3.5 / 0.3, 0.9, 2.0, 3.0 |
Cross-chest strap | 170 | 0.9, 1.6, 2.5, 3.5 / 0.3, 0.9, 2.0, 3.0 |
Thigh strap | 230 | 0.9, 1.6, 2.5, 3.5 / 0.3, 0.9, 2.0, 3.0 |
Hip strap | 230 | 0.9, 1.6, 2.5, 3.5 / 0.3, 0.9, 2.0, 3.0 |
Measurement table: what, how, why
Step 1 of harness fitting instructions is to measure chest girth and neck opening. Use the table below to guide you.
What to Measure | How to Measure | Why It Matters |
|---|---|---|
Chest girth | Wrap tape or string around widest ribcage, record in in/cm | Main sizing driver, prevents rubbing |
Neck opening | Measure base of neck, not collar spot, record in in/cm | Prevents squeeze or escape |
Coat allowance | Brush or flatten coat before measuring | Avoids false tightness |
Fit allowance | Add 0.5-1 in (1-2.5 cm) for comfort | Allows breathing and movement |
Between sizes | Size up if at top end, use adjusters | Reduces pinch risk |
Accurate girth and neck measurements help you choose the right harness size.
Adjustable straps make harness fitting instructions easier and safer.
Durable materials like polyester or nylon improve comfort and safety.
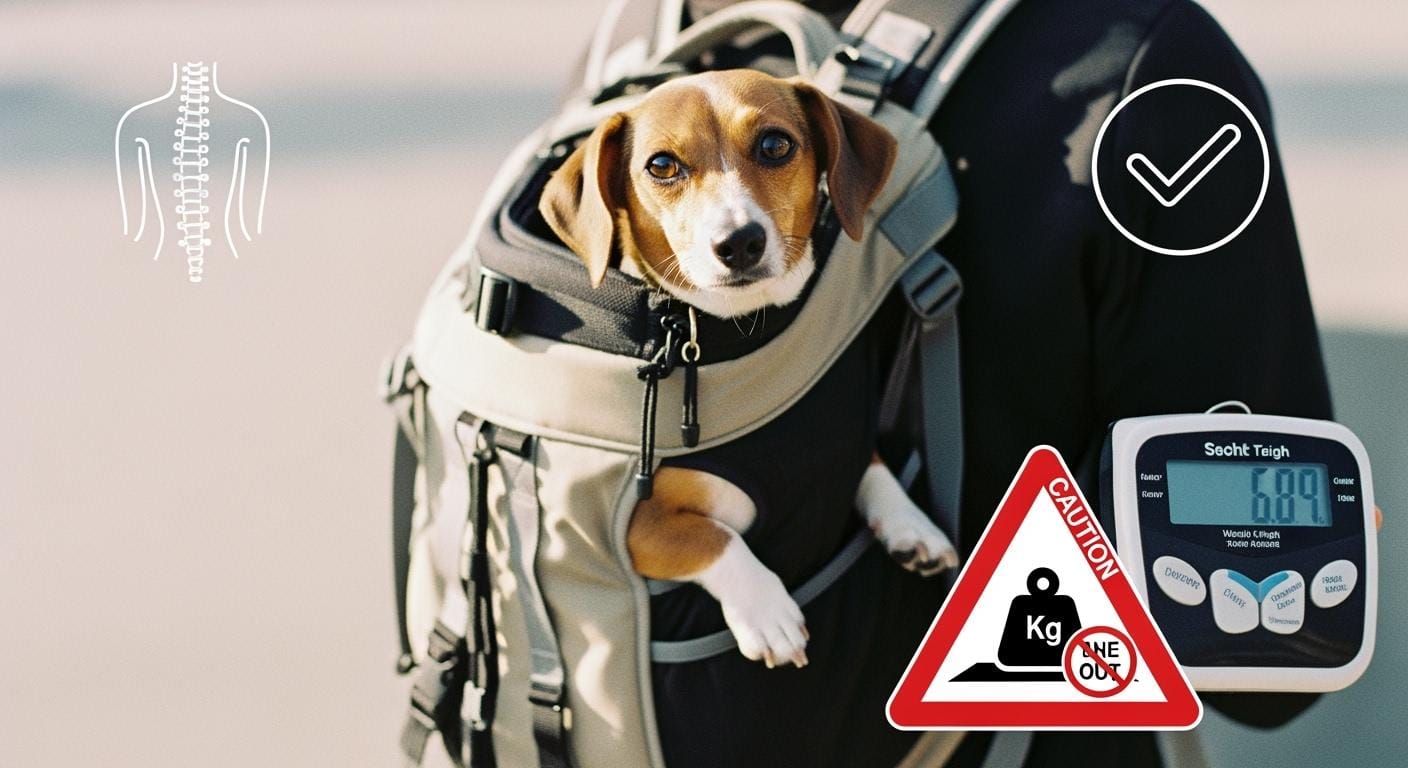
Scenario A: Your dog is between sizes. The harness rubs behind the elbows. You need to check chest girth, elbow clearance, and adjustment range. If the harness fitting instructions show the straps are too short, size up and adjust for comfort.
You can follow these harness fitting instructions to make better choices, reduce returns, and keep your dog safe every day.
Check harness adjustment range
Why adjustment range matters
You need to check the adjustment range before you pick a harness size. Adjustment range means how much you can tighten or loosen the straps. Dog harnesses with good adjustability let you fit different breeds and body shapes. You can make the harness snug around the chest while keeping the shoulders free. You should adjust the harness as your dog grows or changes weight. This helps prevent discomfort and keeps your dog happy during walks.
Adjustability gives a tailored fit for many breeds.
A snug fit with shoulder movement improves mobility.
Regular adjustments help avoid irritation as your dog changes size.
Spotting too-short or too-long straps
You can spot straps that are too short or too long by checking these signs:
The chest strap sits close to the armpits and rubs the skin.
The strap between the front legs is too wide and causes chafing.
Your dog avoids or resists the harness, showing discomfort.
Slide two fingers under the harness. If you cannot, it may be too tight.
Look for red marks or irritated skin after removing the harness.
Watch if your dog moves awkwardly or seems restricted.
Always check the harness after putting it on. If your dog hesitates to walk or shows irritation, reassess the fit.
Quick range check rules
You can use these quick rules to check if the adjustment range is right:
Make sure the harness has multiple adjustment points.
Watch for awkward walking or refusal to walk.
Scan for chafing marks or hair loss where the harness sits.
Tip: Step 3 is to confirm the adjustment range before you commit to a size. If your dog is between sizes, pick the larger one and use the adjusters.
Adjustment range table
Strap Zone | What Good Range Looks Like | Red Flags | Fix |
|---|---|---|---|
Chest strap | Sits at widest ribcage, not armpit | Rubbing, tightness, red marks | Size up, loosen strap |
Neck strap | Sits at base of neck, not collar spot | Squeezing, escape, pressure on throat | Adjust, re-measure |
Shoulder strap | Allows free movement | Restricts stride, cuts across shoulder | Reposition, check style |
Belly strap | Snug, not compressing fur | Chafing, loose webbing, twisting | Tighten, trim excess |
Parameter and value table
Parameter | Target range or option | Why it matters |
|---|---|---|
Chest girth | measured at widest ribcage | Main sizing driver |
Neck opening | base of neck measurement | Prevents head squeeze or escape |
Entry style | overhead or step-in | Changes how harness goes on |
Adjustment range | mid-range fit preferred | Prevents running out of strap |
Allowance | 0.5-1 in (1-2.5 cm) | Comfort starting point |
Between sizes | size up if at top end | Reduces pinch risk |
Finger check | two-finger starting check | Quick fit validation |
Elbow clearance | no rubbing behind elbows | Prevents hotspots |
Shoulder freedom | no restriction | Improves comfort |
Post-walk check | re-check after short walk | Catches twist and rub |
Scenario A continued: If your dog is between sizes and the harness rubs behind the elbows, check the adjustment range. If the straps are maxed out and still tight, size up and use the adjusters. This helps you avoid returns and keeps your dog safe.
Dog harnesses with a good adjustment range help you get the best fit. You can prevent rubbing, slipping, and discomfort by following these steps.
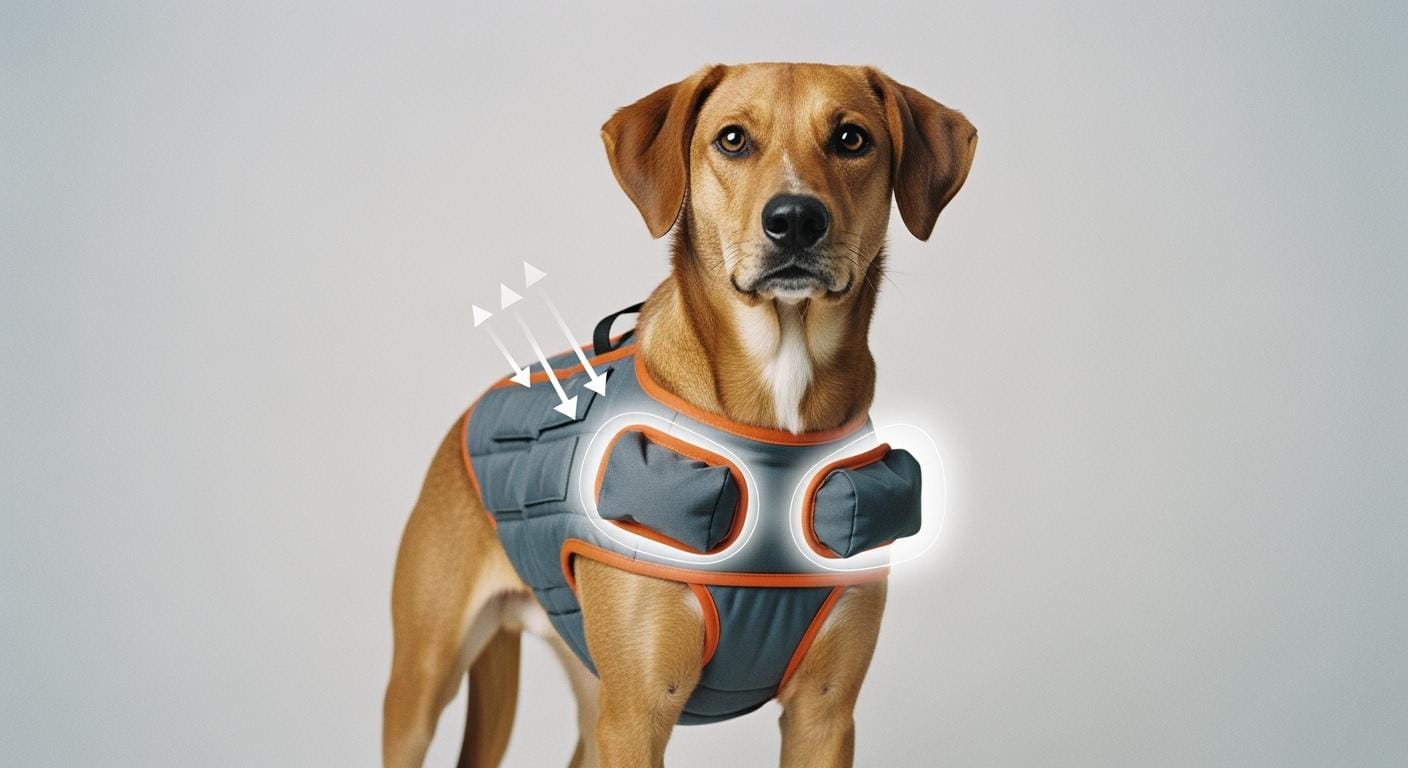
How to put on harness dog: step by step
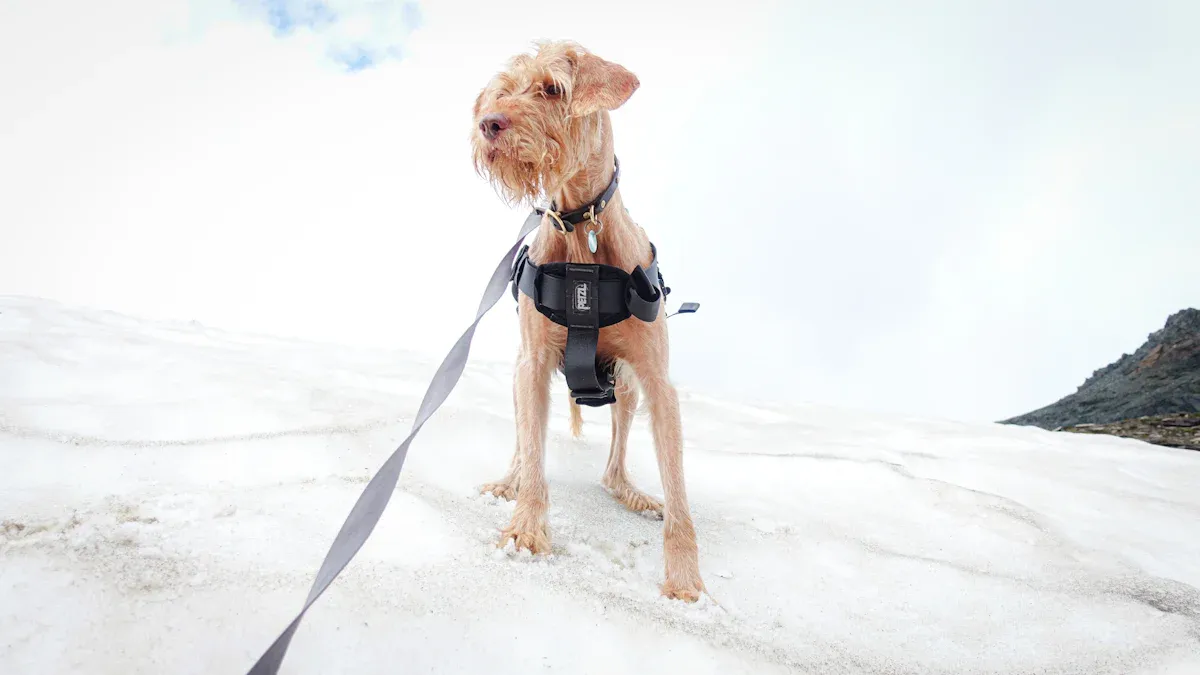
Learning how to put on harness dog the right way helps you avoid common problems like slipping, rubbing, and escape. This step-by-step guide covers the main harness styles and shows you how to check fit for safety and comfort. You will see tips for puppies and nervous dogs, plus advice for making first adjustments.
Put on a dog harness: overhead style
Overhead harnesses are popular because they offer control and security. You need to follow these steps to put on a dog harness with an overhead design:
Ask your dog to sit close to you. Calm your dog with gentle words or treats.
Slide the harness over your dog’s head. Make sure you use the correct neck opening.
Arrange the bottom straps between your dog’s front legs, under the belly.
Bring the buckles up behind the front legs and snap them together on the back.
Use the adjustment points to fit the harness snugly. You should be able to slide two fingers under any strap.
Check that the chest plate sits at the widest part of the ribcage, not near the armpits.
Attach the leash to the correct ring. Give praise and treats.
Tip: For puppies or nervous dogs, let them sniff the harness first. Move slowly and reward calm behavior.
How to put on a step-in harness
Step-in harnesses work well for dogs who dislike things going over their heads. Here is how to put on a step-in harness:
Lay the harness flat on the floor. Position the leg holes so your dog can step in easily.
Guide each front paw into the correct loop. Make sure the straps do not twist.
Lift the harness up and buckle it around your dog’s chest and shoulders.
Adjust the straps so you can fit two fingers under each one. Straps should clear the shoulder blades for free movement.
Check for symmetry. The chest plate should be centered, and straps should be even.
Attach the leash to the clip that matches your dog’s walking style.
Note: Always check for twisted straps before walks. Twists can cause rubbing and discomfort.
How to put on a back-clip dog harness
Many dog harnesses use a back-clip design for easy leash attachment. Here is how to put on a back-clip dog harness:
Lay out the harness with the smaller front loop ready for the head and the larger rear loop for the chest.
Slip the neck hole over your dog’s head.
Help your dog lift one front leg and place it into the harness.
Bring the strap under the belly and click it together near the opposite leg.
Make sure the D-ring sits on top, behind the shoulder blades.
Adjust the fit using the two-finger rule. Straps should be snug but not tight.
Clip the leash to the D-ring and reward your dog with treats.
Tip: If your dog has a thick coat, check the fit after brushing. Re-adjust as needed for seasonal changes.
How to put on a head collar harness
Head collar harnesses help with control, especially for strong pullers. Follow these steps for how to put on a head collar harness:
Hold the head collar open with the nose loop hanging down.
Position the neck strap high on your dog’s neck, adjusting for loose skin.
Slide the nose loop through the center ring and encourage your dog to place their nose through the loop using treats.
Secure the collar and make final adjustments. Only one finger should fit under the neck strap.
Check that the nose loop is snug but not tight. Your dog should be able to open their mouth and pant.
Attach the leash to the designated ring.
Note: Practice short sessions with treats to help puppies and nervous dogs get used to the head collar.
First-fit adjustment order
When you put on a dog harness for the first time, follow this adjustment order for best results:
Position the belly strap so it sits behind the elbows, not on soft skin.
Adjust the chest strap to fit at the widest part of the ribcage.
Check where the chest strap and chest bridge meet. The harness should not twist or shift.
Use the two-finger test at all contact points. Straps should be snug but not tight.
Confirm elbow clearance and shoulder freedom. Straps must not rub or restrict movement.
Tip: Re-check the fit after a short walk. Look for pink skin, licking, or signs of discomfort.
Step table: step, pass sign, adjust
The table below shows key steps, what a good fit looks like, and what to adjust if needed.
Step | Pass Sign | What to Adjust |
|---|---|---|
Two-finger fit | Fingers slide in easily | Loosen or tighten straps |
Movement test | Harness stays centered | Adjust strap layout |
Rotation test | Leash clip stays in place | Check buckle position |
Backward pressure | Dog cannot slip out | Tighten belly strap |
Hotspot check | No pink skin or licking | Move straps, try new style |
Scenario B: If your dog can back out of the harness during distractions, check the neck opening and chest placement. The neck opening should sit at the base of the neck, not high near the ears. The chest plate must cover the widest part of the ribcage. If your dog still escapes, try a harness with a second belly strap or switch to a different style. These steps help reduce slip risk and improve safety.
Fit checks to prevent rubbing and slipping
Dog harnesses need regular fit checks to keep your dog safe and comfortable. You can prevent rubbing, slipping, and escape by following these steps.
Shoulder and elbow clearance
Check shoulder and elbow clearance every time you fit a harness. The straps should not cross the front of the shoulder joint or rub the soft area behind the elbows. You want your dog to move freely. If the harness restricts movement, your dog may change how they walk. This can lead to discomfort or even injury. Use a soft tape to measure the widest part of the chest and the base of the neck. Make sure the straps lie flat and do not twist.
Tip: Watch your dog walk and run. If you see awkward movement or hesitation, adjust the harness for better clearance.
Escape and twist checks
You can stop escape and twisting problems with a few simple checks:
Slide two fingers under each strap to confirm a snug fit.
Observe your dog during walks for slipping or shifting.
Apply gentle backward pressure on the leash to test for escape risk.
Loosen all straps before fitting, then secure them properly.
Make sure your hand fits between the harness and your dog’s body, but you cannot make a fist.
Check for at least 3 in (8 cm) of webbing past the buckle for safety.
If the harness rotates or shifts, adjust the straps or try a different style.
Hotspot check after walking
After each walk, check for hotspots or irritation. Look for red marks, itching, or hair loss where the harness touches the skin. Make sure the harness is not too tight. The skin should be dry and clean. If you see irritation, let the skin heal before using the harness again.
Note: Most dog harnesses use soft materials to reduce chafing, but only a good fit prevents rubbing.
Fit test table
Use this table to run fit checks after a short walk and fine-tune the harness:
Fit Check | Pass Sign | What to Change |
|---|---|---|
Two-finger test | Fingers slide in easily | Loosen or tighten straps |
Shoulder clearance | Dog moves freely | Adjust strap layout |
Elbow clearance | No rubbing behind elbows | Reposition belly strap |
Rotation test | Harness stays centered | Check buckle position |
Hotspot check | No pink skin or licking | Move straps, try new style |
Mistakes table
Mistake | What It Leads To | What to Do Next |
|---|---|---|
Straps too tight | Rubbing, red marks, discomfort | Loosen straps, re-check fit |
Straps too loose | Slipping, escape risk | Tighten straps, test movement |
Wrong chest placement | Restricted movement, hotspots | Reposition harness, measure again |
Twisted straps | Chafing, uneven pressure | Untwist, lay straps flat |
Scenario B continued: If your dog backs out of the harness or shows signs of rubbing, check the neck opening and chest placement again. Make sure the neck opening sits at the base of the neck and the chest plate covers the widest part of the ribcage. Adjust the straps or try a different harness style if problems continue. These steps help you make better choices and keep your dog safe.
Harness sizing for retailers and brands
Product page copy tips
You want your product pages to help people pick the right size fast. Use easy words and simple steps. Show chest girth and neck opening in inches and centimeters. Give a step-by-step guide for measuring at home. Add pictures of harnesses on different dogs and body types. Show customer reviews and real photos to build trust. Point out important features like adjustment range and comfort spots.
Tip: Use bullet points for sizing steps so shoppers can read them quickly.
Spec checklist for harness sizing
A good spec checklist helps customers and support teams avoid mix-ups. Make sure you add:
Chest girth range in inches and centimeters
Neck opening range in inches and centimeters
Adjustment range for each strap
Entry style (overhead or step-in)
Fit allowance (0.5-1 in / 1-2.5 cm)
Advice for dogs between sizes
Material type and care steps
You can use a table to show these specs for easy reading.
Customer support script
When customers ask about sizing, you need a clear and friendly answer. Here is an example:
“Thanks for your question. To get the best fit, please measure your dog’s chest girth at the widest part behind the front legs and the neck opening at the base of the neck. Use a soft tape or string, and check both sizes in inches and centimeters. If your dog is between sizes, we suggest picking the bigger one and using the adjusters. Tell us your measurements, and we will help you choose the right harness.”
OEM and ODM explainer
OEM means Original Equipment Manufacturer. You work with an OEM if you want a product made with your own design and brand. ODM means Original Design Manufacturer. You pick an ODM if you want a ready-made product with your brand label. Both choices let you sell harnesses with custom sizing and features for your customers.
Strategies to reduce returns
Strategy | Description |
|---|---|
Comparative Size Information | Show how sizes are different across brands to help customers pick the right fit. |
Utilize Customer Reviews | Show reviews and photos to help buyers feel sure. |
Gather Feedback on Returns | Ask why returns happen and use the info to make better products. |
Clear Return Policies | Make your return policy easy to find and simple to read. |
Detailed Product Descriptions | Give all details and point out key features to stop confusion. |
Note: When you give clear sizing info and help, you make it easier for customers to choose and keep returns low.
Safety reminder: If your dog shows pain or skin problems, stop using dog harnesses and ask a veterinarian or trainer for advice.
You need to measure chest girth and neck opening for a proper fit. Always check the adjustment range and follow each fitting step. Use fit checks to keep your dog safe and comfortable. Correct sizing for dog harnesses helps you avoid returns and keeps your dog happy. Share your experience or ask questions if you need help.
FAQ
How do you measure your dog’s chest girth for a harness?
Wrap a soft tape around the widest part of your dog’s ribcage, just behind the front legs. Record the measurement in inches and centimeters. Use a string and ruler if you do not have a tape.
What is the neck opening on a harness?
The neck opening is the part of the harness that sits at the base of your dog’s neck. It is not the same as a collar size. Measure around the base for a proper fit.
How tight should a dog harness be?
You should fit two fingers under each strap. Straps must be snug but not tight. Your dog needs room to breathe and move. Check for rubbing or slipping after a short walk.
What if your dog is between harness sizes?
Choose the larger size if your dog’s measurement is at the top end of a range. Use the adjusters for a better fit. Add 0.5-1 in (1-2.5 cm) for comfort.
How do you know if a harness fits correctly?
Look for these signs:
Harness stays centered
No rubbing behind elbows
Dog moves freely
No pink skin or licking after walks