Building a repeatable sizing system is one of the highest-leverage decisions when you develop a dog harness no pull product for wholesale or private label. Fit consistency is a quality-control issue that affects returns, reviews, and support workload. This guide shows how brands can standardize measurement, grading, and fit trials so factories and QC teams can execute the same fit intent across batches.
Last reviewed: 2025-12-15. Scope: sizing, grading, fit trials, labeling, and batch change control for dog no-pull harness products. This page does not certify compliance with any regulation, and it does not make veterinary or behavioral guarantees. Final requirements should be aligned to your target market, claims policy, and buyer acceptance criteria.
Key Takeaways
- A good sizing system lowers returns and makes customers happy. Try to make a fit that works for many dog breeds.
- Make a checklist to set sizing goals. Check for fit tolerance, repeatability, and if it matches brand rules.
- Important measurements are chest girth, neck girth, and back length. Correct measurements help make a good sizing chart.
- Decide what a good no-pull fit should be. The harness must stay in place and not hurt the dog.
- Test your sizing system often with new dog breeds. This makes sure it works for all dog shapes.
- Use soft measuring tape to get correct measurements. Hard tapes can make sizing wrong.
- Try a fit trial with many dog types. This checks sizing and finds problems early.
- Give clear size labels and help for customers. This lets them pick the right harness and stops confusion.
Authority, Validation, and Evidence Pack
To strengthen authority for a B2B audience, treat sizing and fit as a controlled process with traceable evidence. Instead of unsupported market statistics, keep a SKU-level file that a buyer can audit.
What to keep on file (SKU-level)
- Spec sheet + grading matrix: size ranges, tolerances, strap adjustment ranges, and version control.
- Measurement SOP: tape placement diagrams, rounding rules, operator training rules, and photo angles.
- Fit-trial report: sample plan (dog types), pass/fail rubric, photos, and corrective actions.
- Batch verification record: what was checked per lot, what failed, and what was reworked.
- Optional independent lab support: when required by customers, align material/component tests to a competent lab framework such as ISO/IEC 17025, and record test method IDs used (for example, webbing tensile strength per ASTM D6775).
Claims guardrails (buyer-facing)
- Avoid claims like “fits all breeds” or “eliminates pulling.” Use testable language such as “front-clip design supports redirection” and “sizing validated via fit trial protocol.”
- Do not publish hard performance ratings for other brands. If you need comparisons, compare design categories and disclose that outcomes depend on training, anatomy, and fit.
Dog Harness No Pull Sizing Challenges for Brands
Sizing Goals and Fit Consistency
You want every customer to get a harness that fits their dog well. You need a sizing system that works for many breeds and body types. You must set clear goals for your sizing system. These goals help you measure success and reduce returns.
Checklist: Sizing System Acceptance Goals
- Define fit tolerance for each size
- Ensure repeatable fit for at least 90% of dogs in each size range
- Minimize overlap and gaps between sizes
- Align with your brand’s fit and comfort guidelines
- Validate with real dogs of different shapes and sizes
- Document all measurement and grading steps
You should always cross-reference your brand’s guidelines. Each brand may have unique fit standards. You must also consider the wide range of dog body shapes. Adjustable straps help you cover more breeds and sizes. Secure buckles and quality materials keep the fit consistent during walks and play.
Tip: Regularly check your harness sizing system with new dog breeds to make sure it still works.
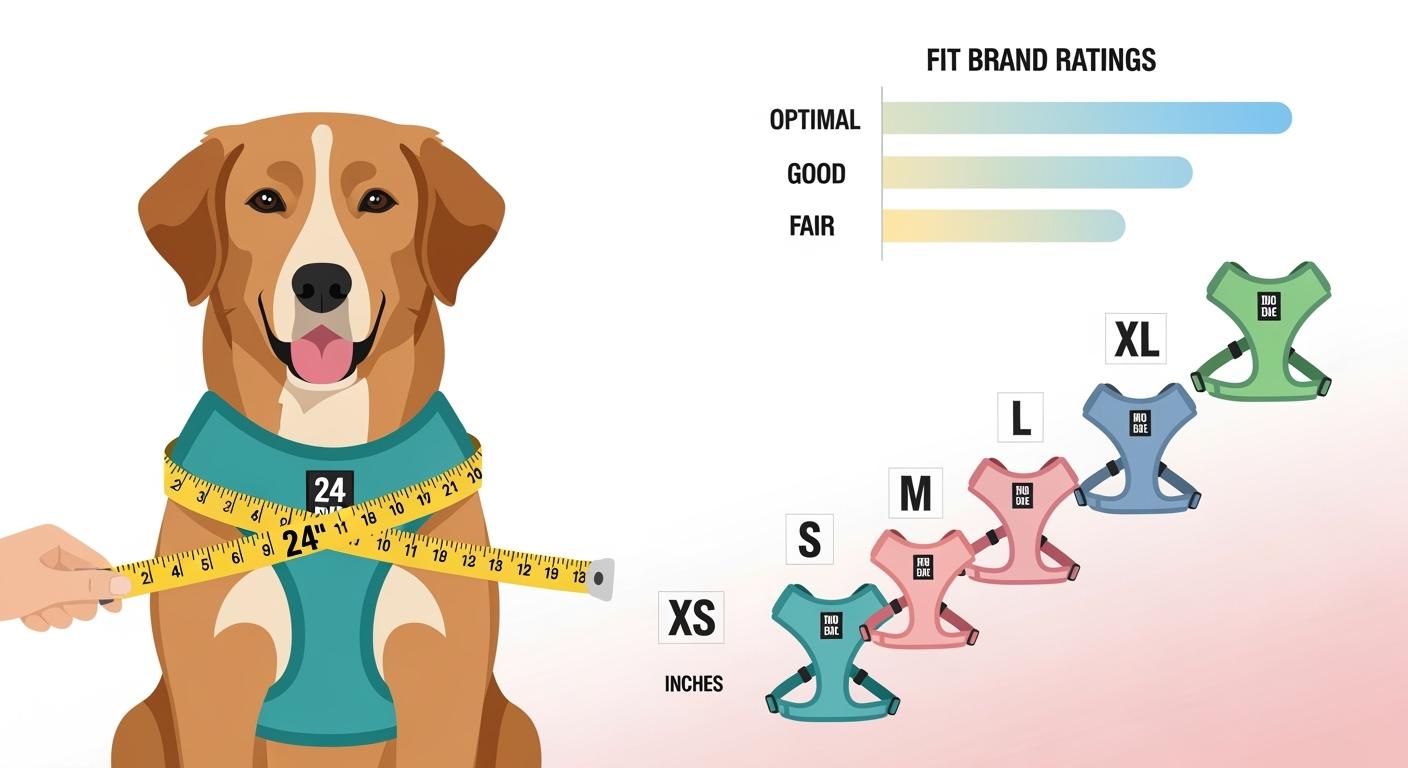
Key Measurements: Girth, Neck, Length
You need to focus on the key measurements for dog harness sizing. These include chest girth, neck girth, and back length. Accurate measurements make your sizing chart reliable. You should measure the chest at the widest point, the neck where the collar sits, and the length from the base of the neck to the base of the tail.
- Sizing can differ a lot between brands, so always use your own chart.
- Always measure chest girth, neck girth, and back length.
- Adjustable straps around the neck and chest help fit more dogs.
- Check the fit often, especially for growing dogs.
You can also consider weight range and breed-specific body proportions. These steps help you create a harness that fits well and feels comfortable.
Defining No-Pull Fit Outcomes
You must define what a successful no-pull fit looks like. A good fit means the harness stays in place and does not rub the dog’s skin. The harness should not slip or twist during movement. Adjustable straps give you flexibility for different body shapes.
| Harness Design Category | Fit-Control Notes (Validate With Your Trial Data) |
|---|---|
| Front-clip no-pull harness | Validate chest-strap placement, shoulder clearance, and twist resistance during gait changes. |
| Back-clip harness | Validate comfort, stability, and strap-tail management across the full adjustment range. |
| Y-shaped chest panel vs. H-shaped strap layout | Validate pressure points, range coverage, and whether the chest panel stays centered after turns and stops. |
| Dual-clip options (front + back) | Validate that both attachment points remain accessible across sizes and coat types. |
Use your defined fit outcomes and your own trial results to guide grading decisions. This keeps your sizing system consistent and reduces avoidable returns.
No-Pull Dog Harness Measurement Methods
Measurement Map and Tape Placement
You need to use the right tools and steps to get accurate measurements for harness sizing. Start with a soft measuring tape, a pen, and paper. A soft tape wraps around your dog’s body and gives you the most reliable numbers. Rigid tapes do not bend well and can cause errors.
“Using a soft measuring tape is the most reliable way to ensure you get the right size.”
Follow these steps for each measurement:
- Wrap the tape around the broadest part of your dog’s chest. Keep it snug but not tight.
- Place the tape around the neck where a collar sits. Make sure it feels firm but comfortable.
- Measure the back length from the base of the neck to just before the tail starts, if needed.
- Write down each number. Double-check and repeat the process for accuracy.
Checklist: Measurement SOP
- Use a soft, flexible tape
- Measure girth, neck, and (if needed) back length
- Repeat each measurement at least twice
- Round to the nearest 0.5 in (1 cm).
- Take photos from the side and above for records
- Record operator name and date
Handling Coat, Body Shape, and Breed Variance
Dogs come in many shapes and sizes. You must adjust your method for each dog. For thick-coated dogs, part the fur and measure close to the skin. This prevents the harness from fitting too tightly once the fur settles. Compact breeds need harnesses that fit well but do not overwhelm their frame. Long-bodied dogs, like Dachshunds, need a different fit than broad-chested breeds.
- Part thick fur to measure close to the skin
- Adjust for unique body shapes
- Choose harnesses that match the dog’s build
Always use the two-finger rule. You should fit two fingers between the tape and the dog’s body. This ensures comfort and prevents the harness from being too tight. When adjusting straps, tighten both sides equally to keep the harness centered.
Data Hygiene and Repeatability
You need to keep your measurement data clean and repeatable. Use clear labels for each measurement and operator. Store photos and notes with each record. Use filters to remove errors, especially for small dogs. Compare results from different operators to check for consistency.
| Control | How to Execute |
|---|---|
| Repeat measurement | Measure each key dimension at least 2 times per dog and record both values. Re-measure if variance exceeds your tolerance. |
| Operator consistency | Train operators on the same tape placement and rounding rule; audit new operators against a reference operator. |
| Photo evidence | Capture side and top-down photos showing tape placement and harness fit points for traceability. |
| Outlier handling | Flag records affected by posture changes, heavy coat interference, or tape slippage; do not average “bad” data into your chart. |
Repeat your process for every dog. This helps you build a strong, reliable sizing system for your dog harness products.
Dog Harness No Pull Grading Rules
Base Size and Grade Increments
You need to set a clear base size for your harness sizing system. Start by choosing a reference dog that fits the middle of your target range. Measure this dog carefully and use these numbers as your base. Next, decide how much each size will increase. Grade increments should be consistent and practical. For example, you might increase chest girth by 2 in (5 cm) per size. This helps you cover a wide range of dogs without leaving gaps.
Tip: Always check that your increments match real dog body changes, not just numbers on paper.
Checklist: Grading Matrix Fields
- Size label (e.g., XS, S, M, L, XL)
- Chest girth range (min-max)
- Neck girth range (min-max)
- Back length (if used)
- Webbing length for each strap
- Panel length and width
- Plate size (if used)
- Adjustment range for each strap
- Tolerance for each measurement
- Notes for special fit considerations
Grading Webbing, Panels, and Plates
You must grade each harness part with care. Webbing, panels, and plates all need to scale with the dog’s size. If you make the webbing too wide for a small dog, it feels bulky. If you make it too narrow for a large dog, it may not hold up. Panels should cover enough area for comfort but not restrict movement. Plates, if used, must fit the dog’s chest or back without causing pressure points.
| Attachment System | Time to Attach Gear | Best For |
|---|---|---|
| MOLLE | 2-5 minutes | Heavy gear, secure hold |
| Velcro Panel | Seconds | Patches, quick changes |
MOLLE systems use strong nylon that resists tearing and fraying. This makes them a good choice for harnesses in tough conditions. Velcro panels work well for quick changes, but you need to check and clean them often to keep them working. When you grade these parts, match the material and attachment method to the size and use case of the harness.
Avoiding Overlap and Gaps
You want each size to fit a clear group of dogs. Overlap between sizes can confuse customers and lead to returns. Gaps leave some dogs without a good fit. To avoid these problems, set your size ranges so they touch but do not overlap too much. Use your fit trial data to adjust the ranges if you see problems.
Note: Always test your grading system with real dogs. Adjust your size ranges if you see too many returns or fit issues.
A good grading matrix helps you see where your sizes start and stop. It also helps you spot any gaps or overlaps before you launch your product.
Grading Matrix Template
| Size | Chest Girth (in/cm) | Neck Girth (in/cm) | Back Length (in/cm) | Webbing Length (in/cm) | Panel Length (in/cm) | Plate Size | Adjustment Range (in/cm) | Tolerance (in/cm) | Notes |
|------|------------------------|--------------------|---------------------|------------------------|----------------------|-----------|---------------------------|-------------------|-------|
| XS   | 11.8–15.7 in (30–40 cm) | 7.9–11.0 in (20–28 cm) | 7.9–9.8 in (20–25 cm) | 13.8 in (35 cm) | 4.7 in (12 cm) | Small  | 2.0 in (5 cm) | ±0.4 in (±1 cm) | For toy breeds |
| S    | 15.0–19.7 in (38–50 cm)  | 10.2–13.4 in (26–34 cm)  | 9.4–11.8 in (24–30 cm)  | 16.5 in (42 cm)  | 5.9 in (15 cm)  | Small  | 2.4 in (6 cm)  | ±0.6 in (±1.5 cm)  | For small breeds |
| M    | 18.9–24.4 in (48–62 cm)  | 12.6–16.5 in (32–42 cm)  | 11.0–14.2 in (28–36 cm)  | 19.7 in (50 cm)  | 7.1 in (18 cm)  | Medium | 2.8 in (7 cm)  | ±0.8 in (±2 cm)  | For medium breeds |
| L    | 23.6–30.7 in (60–78 cm)  | 15.7–20.5 in (40–52 cm)  | 13.4–17.3 in (34–44 cm)  | 23.6 in (60 cm)  | 8.7 in (22 cm)  | Large  | 3.1 in (8 cm)  | ±1.0 in (±2.5 cm)  | For large breeds |
| XL   | 29.9–37.4 in (76–95 cm) | 19.7–25.6 in (50–65 cm) | 16.5–20.5 in (42–52 cm) | 27.6 in (70 cm) | 10.2 in (26 cm) | Large  | 3.5 in (9 cm) | ±1.2 in (±3 cm) | For giant breeds |
Fill in this matrix with your own measurements and ranges. Use it to guide your dog harness no pull product development and quality checks.
No-Pull Harness Adjuster Placement
Adjuster Count and Location
You need to pay close attention to the number and location of adjusters on your no pull harness. More adjustment points give you better control over fit. When you add adjusters at the shoulders, chest, and legs, you can fine-tune the harness for each dog. This helps you avoid pinching and keeps the harness snug without being too tight. A harness with five adjustment points gives you more options than one with only three. You lower the risk of a dog slipping out and improve safety. Place adjusters so you can align the chest strap and keep the dorsal D-ring centered between the shoulder blades. This setup helps distribute force evenly and keeps the harness stable.
Tip: Always check that each adjuster is easy to reach and does not interfere with the dog’s movement.
Checklist: Adjuster Placement Rules
- Place adjusters on both sides for symmetry
- Keep strap tails short and secure with keepers
- Add stitch stops to prevent slipping
- Make sure adjusters do not press on joints or sensitive areas
- Use the same number of adjusters on each side for balance
Preventing Strap Twist and Pressure Points
You want the dog harness to stay centered on the dog’s back and chest. If the harness twists, it can cause rubbing or pressure points. Design the harness so the straps lay flat and do not shift during movement. Distribute pulling force across the chest and shoulders. This helps prevent sore spots and keeps the dog comfortable. You should avoid placing adjusters where they might dig into the skin. Flat, padded panels can help spread out pressure and reduce the risk of discomfort.
- Center the harness to prevent twisting
- Use wide, flat straps to avoid pressure points
- Check that adjusters do not create bulk in one area
Range Coverage and Strap Tail Management
You need to make sure the harness sizing covers a wide range of dogs. Adjusters help you fit dogs with different body shapes. Strap tails should not hang loose, as they can get caught or chewed. Use strap keepers to hold extra length. Stitch stops keep the adjusters from sliding too far. Always check that the adjustment range matches your harness sizing chart. This ensures a secure fit for each size.
Note: Review strap tail length and keeper placement during your fit trial to catch any issues before launch.
A well-designed no pull harness uses adjusters to give you flexibility, safety, and comfort. Careful placement and management of adjusters help you deliver a product that meets your fit outcomes and reduces returns.
No Pull Harness Fit-Trial Protocol
Recruit Plan for Diverse Dog Types
You need a strong recruit plan to test your dog harness no pull product. Select dogs with different body shapes, coat types, and sizes. Include breeds with deep chests, short legs, long backs, and thick fur. This approach helps you validate harness sizing for a wide range of users. You should record key measurements for dog harness sizing before starting the trial. Use practical sizing verification to check each harness fit. Make sure you include dogs that represent your target market. This step reduces risk and helps you recognize dangerous fitting errors early.
Fit Trial Scorecard Checklist
- Dog breed and body type
- Chest girth, neck girth, back length
- Harness size used
- Adjustable straps checked
- Comfort during movement
- Signs of rubbing or pressure points
- Photos from side and above
- Notes on proper fit and any issues
Fit Trial Steps and Walk Test
You must follow clear steps to test the no-pull dog harness. Start by letting each dog sniff and investigate the harness. Use treats to create a positive experience. Place the chest strap across the dog’s chest and the back strap behind the shoulders. Fasten the main buckles without tightening them. Adjust each strap so you can fit two fingers between the harness and the dog. This step ensures a comfortable and effective fit.
Take the dog for a short walk indoors or in a safe outdoor area. Observe how the harness moves as the dog walks, sits, and lies down. Check for any movement issues or discomfort. Test the harness by gently pulling it over the dog’s head and adjust the chest strap if needed. Use the front-chest leash attachment to see how the harness controls pulling. Repeat the walk test to confirm consistent results. This process helps you verify proper harness sizing and fit outcomes.
Pass/Fail Rubric and Inspection
You need a simple rubric to inspect each harness after the fit trial. Use clear criteria to decide if the harness passes or fails. Look for legible tags, signs of damage, and overall fit. Recognizing dangerous fitting errors is key to quality control.
| Criteria | Outcome |
|---|---|
| Legible tag | Pass |
| No damage found | Pass |
| Any damage found | Fail |
Record your findings in a fit trial report. Use sizing verification techniques to support your decisions. Take photos and write notes for each dog. This step helps you improve your dog-walking equipment and ensures proper fit for all users.
Fit Trial Report Form Template
## Fit Trial Report

- Dog Breed/Type:
- Key Measurements (Chest/Neck/Back):
- Harness Size Used:
- Adjustable Straps Checked: Yes/No
- Comfort Observed (Y/N):
- Signs of Rubbing/Pressure Points:
- Front-Chest Leash Attachment Test: Pass/Fail
- Legible Tag: Pass/Fail
- Damage Inspection: Pass/Fail
- Photos Attached: Yes/No
- Notes on Proper Harness Sizing and Fit Outcomes:
A strong fit-trial protocol helps you deliver a no-pull harness that meets comfort and safety standards. Use these steps to validate your harness sizing and reduce returns.
Dog Harness Labeling and Customer Guidance
Size Label Logic and Overlap Guidance
Clear size labels help customers pick the right harness fast. Use a system that matches your harness sizing chart. Each size should fit a certain measurement range. Try not to let sizes overlap too much. Too much overlap can make buyers confused. Gaps can mean some dogs do not get a good fit. Show customers which measurements matter most. Picking the right harness and making sure it fits is important. This helps both the owner and the dog have a good walk.
When you make your labels, add these measurement points:
- Neck circumference: Measure just below the collar area.
- Chest girth: Measure around the widest part behind the front legs.
- Back length (optional): Measure from the neck base to the tail start.
- Breed-specific considerations: Adjust for special body shapes.
You can also give tips for special cases:
- Small fluffy breeds: Leave extra space for fur.
- Stocky breeds: Focus on chest girth and pick adjustable harnesses.
- Active dogs: Use strong adjustment points for safety.
- Senior dogs: Pick soft padding and easy on/off features.
Instruction Sheet: Measuring and Fitting
Include a simple instruction sheet with every harness. This helps customers measure and fit the harness the right way. Clear instructions help stop mistakes and lower returns. Use diagrams to show where to measure and how to put on the harness.
Key steps for measuring and fitting:
- Measure behind the front legs and over the back for chest size.
- Take neck measurements at the base, where a collar sits.
- Put the harness over the dog’s head with the handle on the back.
- Unbuckle all straps to make fitting easier.
- Adjust straps while the harness is on the dog for a snug fit.
- Secure straps by gripping both parts and sliding the clip.
- Make sure the harness is tight enough to stop escape but loose enough for comfort.
Tip: Always double-check measurements before you adjust straps. This helps make sure the fit is safe and comfortable.
Returns Prevention and Support Scripts
You can stop many returns by giving customers the right help. Give clear sizing guides and train staff to help with measurements. Offer harnesses with adjustable straps to fit more dogs. Give tips on how to test the harness at home.
| Strategy | Description |
|---|---|
| Clear Sizing Guides | Give easy-to-read sizing charts in-store and online. |
| Staff Training | Teach staff to measure dogs and check fit before buying. |
| Adjustable Straps | Offer harnesses with adjustable straps for better fit. |
| Testing Tips | Share tips for testing harness comfort and fit at home. |
| Return Data Review | Check return data to fix common sizing problems. |
Checklist: Hangtag/Insert Requirements
- Show neck, chest, and (optional) back measurements
- Include clear diagrams for measuring and fitting
- Add breed-specific fit tips
- Show warnings about proper adjustment and comfort
- Give customer support contact information
A strong labeling and guidance system helps lower returns and make customers happy. You help customers feel sure about picking and fitting the right harness every time.
Batch Consistency and Change Control for No-Pull Harness
Batch Testing and Fit Verification
You need to check every batch of dog harnesses before selling them. Batch consistency means you follow the same quality steps each time. First, you look at the raw materials to make sure they are strong. During making, you watch how seams and hardware hold up. At the end, you test the harness for fit, comfort, and good packaging.
| Stage of Quality Control | Description |
|---|---|
| Incoming Quality Control (IQC) | Check raw materials for strength and good hardware. |
| In-Process Quality Control (IPQC) | Watch seams and adjusters during making. |
| Final Quality Control (FQC) | Test finished harnesses for fit and comfort. |
You should test samples from each batch for fit. Use your harness sizing chart to see if each size fits right. Try the adjusters, straps, and buckles to make sure they work. Take pictures and write notes for every sample. This helps you find problems early and stop returns.
Checklist: Batch Release Criteria
- All sizes fit right using harness sizing chart
- Materials are strong and last long
- Adjusters, buckles, and straps work well
- Labels and instructions are easy to read
- Each batch has complete records
Change Management and Documentation
You must control changes in how you make harnesses to keep quality high. Treat every change like a project with clear goals and a timeline. Make sure everyone on the team knows their job. Plan for problems and talk often with your team. Help your team learn new ways to work. Celebrate when you finish important steps.
- Treat changes as projects with goals and timelines
- Work closely with everyone involved
- Plan for problems and talk openly
- Help your team learn new things
- Celebrate big wins together
Write down every change you make. Record what changed, why it changed, and who said yes. Save all reports, pictures, and test results for later. Good records help you fix problems and see what works.
Ongoing QA and Feedback Loops
You need to keep checking quality to make your harnesses better. Set clear goals for your QA team. Let everyone share ideas and feedback. Look at feedback from customers and your team often. Use what you learn to update how you work and what you make.
| Best Practice | Description |
|---|---|
| Define Clear Objectives | Set QA goals that match your business needs. |
| Effective Communication | Talk openly so feedback is quick and useful. |
| Continuous Feedback Integration | Update your process with new feedback often. |
| Culture of Psychological Safety | Make it safe for people to share ideas. |
A good feedback loop turns customer ideas into helpful changes. You close the gap between what people want and what you give them. This helps you get better fit and lower risk with every batch.
You can make a strong dog harness no pull sizing system by using clear steps. Try practical sizing verification and sizing verification techniques to check harness sizing. Test harness fit with real dogs to see if it works well. Pay attention to harness sizing and look for dangerous fitting mistakes. Check fit outcomes and change your no-pull dog harness when you get feedback. This helps lower returns and makes customers happier. Stridepaw can help you set up your validation protocol and keep harness quality high.
- Do a fit trial for each batch
- Write down all results and changes
- Change your process when you get new data
FAQ
What measurements do I need for a proper dog harness fit?
You should measure your dog’s chest girth and neck girth. Sometimes you also need to measure back length. Use a soft tape for all measurements. Follow the sizing guide for your harness. Getting the right numbers helps you pick the best size. This lowers mistakes when fitting the harness.
How do I handle dogs with thick coats or unique body shapes?
For dogs with thick fur, part the hair and measure close to the skin. For dogs with special shapes, focus on chest girth. Use adjustable straps to help the harness fit better. These steps make sure every dog feels comfortable in their harness.
Why is repeatability important in harness sizing?
Repeatability means you get the same results every time you measure. This helps lower mistakes and keeps quality high. Using the same method each time gives you reliable fit outcomes. It also helps stop returns from sizing problems.
How can I prevent strap tails from hanging loose?
Use strap keepers to hold extra strap length. Make sure adjusters and tails stay in place when the dog moves. This keeps the harness safe and stops chewing or snagging.
What should I include in a fit trial report?
Write down the dog’s breed and main measurements. Note the harness size and any fit problems. Add photos and notes about comfort and movement. A full report helps you make your product better and check your sizing system.
How do I guide customers to pick the right size?
Give customers a clear sizing guide with pictures and tips. Tell them to measure their dogs before buying. This helps them choose the right harness and lowers returns.
What is the best way to manage changes in harness production?
Write down every change and why it happened. Tell your team about updates and keep records for checks. This helps you keep things consistent and lowers risk.