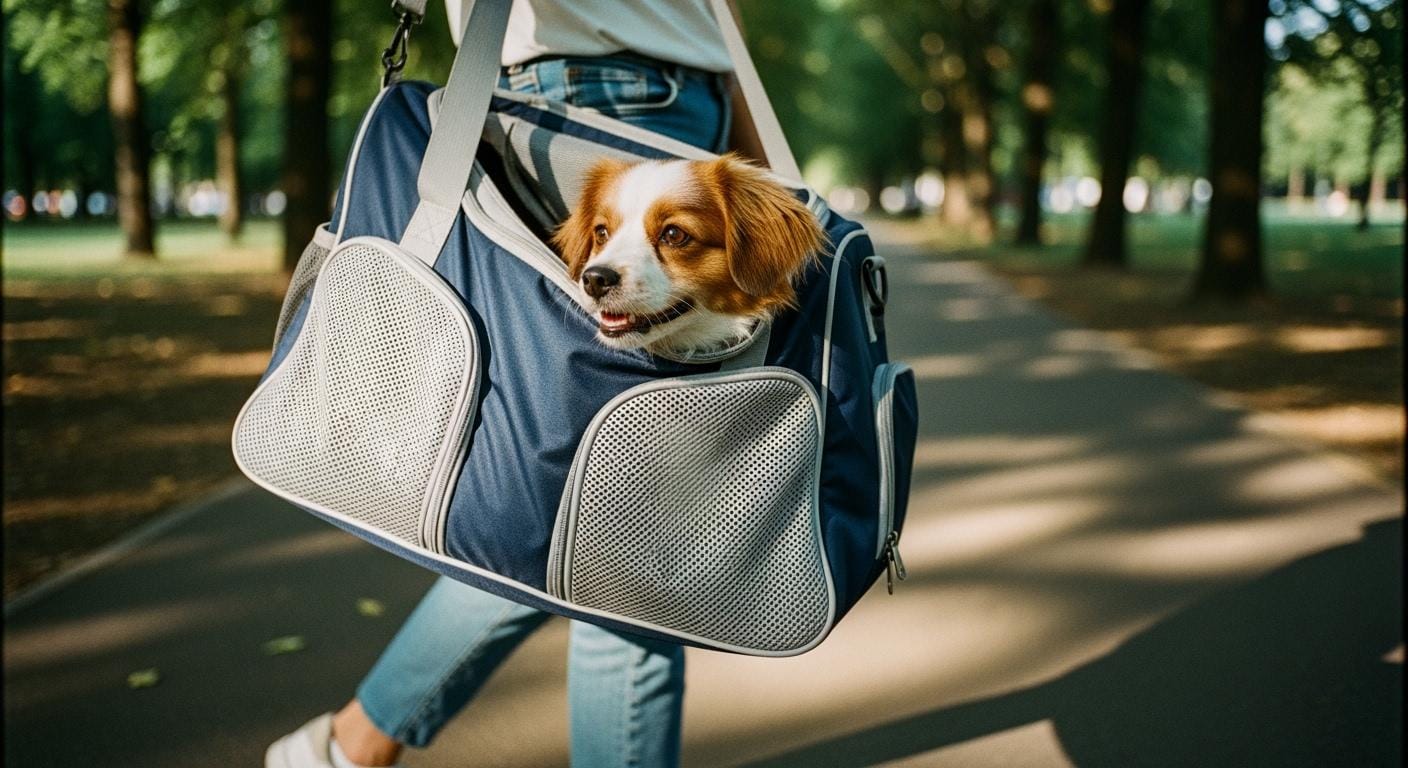
Chafing problems usually begin at the edges. They also happen where hardware or zippers touch the dog’s skin. These problems make people return carriers often. They also cause bad reviews about fit and scratching. You should fix these risks early. Do this when you buy or check a dog backpack carrier. A “no-rubbing” comfort map helps you find problem spots. It lets you use the same rules for every carrier. You can use fit rules like the 【Fit_Clearance_Rule】 and 【Measurement_Points】. This way, you lower returns and make each carrier more comfortable.
Key Takeaways
Find chafing spots early to lower returns and make customers happy.
Use the ‘No-Rubbing Comfort Map’ to make checks the same for all dog backpack carriers.
Look at leg openings and armpits for soft edges and smooth seams to stop rubbing.
Make sure chest panels and zippers do not pinch or scratch by using padded covers and checking the fit.
Test materials often for strength with the Martindale abrasion standards to keep comfort lasting long.
Give customers clear steps on how to fit and care for the carrier to stop comfort problems.
Use a steady QC process with the AQL system to find defects before shipping.
Check comfort and fit during inspections to help customers trust and stay loyal.
What “No Rubbing” Means for Dog Backpack Carrier Programs
Comfort Complaints and Returns
You want fewer returns and bad reviews. Most comfort problems come from rubbing or chafing. These problems usually start at the leg holes, chest, or zipper areas. If you ignore these spots, more people return carriers. Customers also feel less happy. Buyers and QC teams need to use the same rules with suppliers. Always use the 【Fit_Clearance_Rule】 and check all 【Measurement_Points】 when you inspect.
Tip: Put the “No-Rubbing Comfort Map + Fit Check SOP” in every shipment. This helps your team and customers follow the same steps.
You can stop many returns by thinking about comfort early. If you set clear rules for skin-contact spots, you stop friction and pressure problems. This also makes it easier to check if suppliers do things right. When you use the same rules for every carrier, you get better quality and fewer surprises.
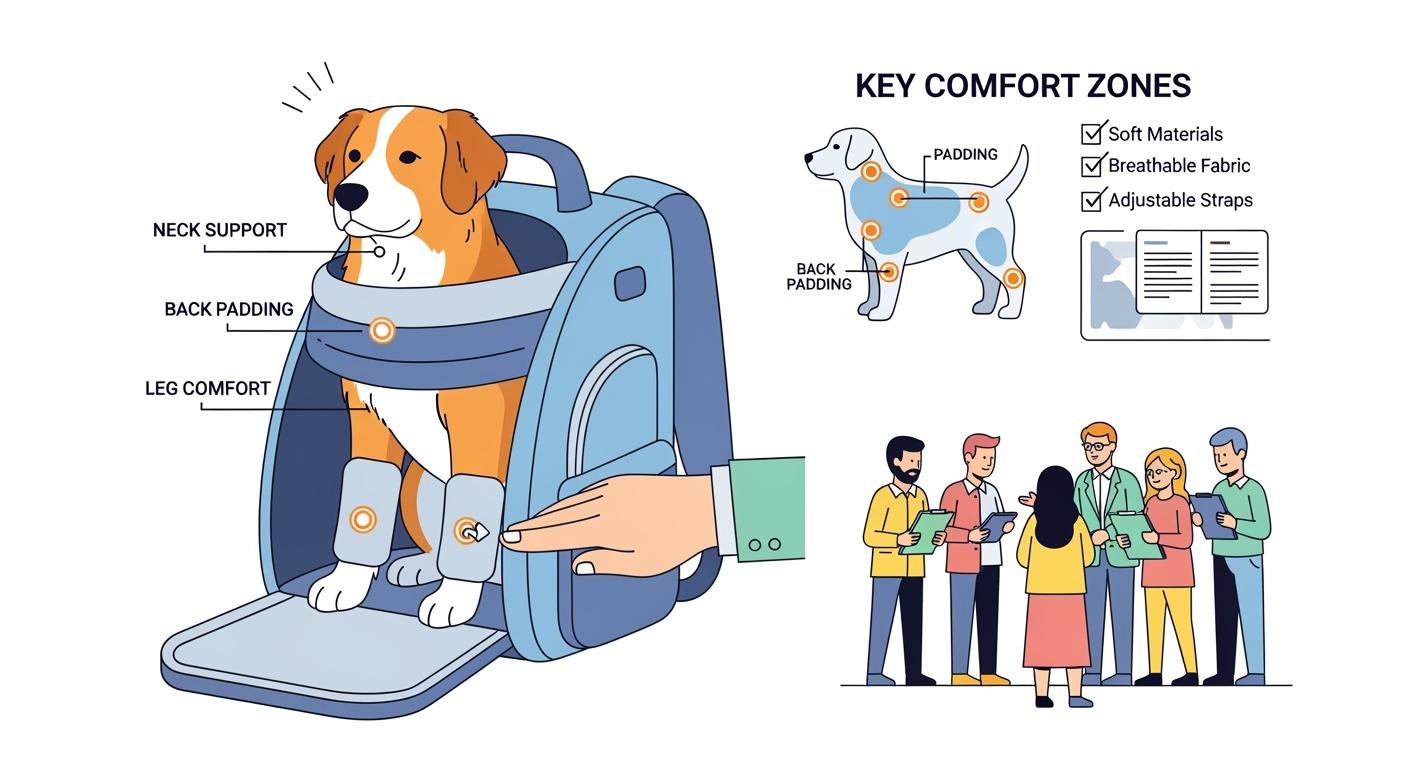
Friction vs Pressure Hotspots
You need to know how friction and pressure hotspots are different. Friction hotspots happen when fabric or seams rub the dog’s skin. These show up at the leg holes, armpits, and zipper edges. Pressure hotspots come from tight straps or panels pressing on the dog. These are found at the chest, neck base, and shoulder blades.
You should mark all 【Chafe_Hot_Zones】 before you say yes to a design. Use this simple table to help you check:
Table: Hotspot Type | Example Zone | What to Check
Hotspot Type | Example Zone | What to Check
Friction | Leg opening edge | Is the binding soft and smooth?
Friction | Zipper garage | Does the zipper cover stop skin contact?
Pressure | Chest panel | Can you fit two fingers under the panel?
Pressure | Neck base | Is there enough padding to spread weight?
You must make all suppliers meet the abrasion and durability rules from your Quick Reference Card. For high-friction spots, use the 【Martindale_Heavy】 standard. For other panels, use the 【Martindale_General】 standard. Always check with the right test for your market: 【Abrasion_Method_EU】 or 【Abrasion_Method_US】.
Note: Never promise “no rubbing guaranteed.” Instead, focus on lowering risks and checking steps.
If you follow these steps, every dog backpack carrier will be more comfortable and better quality.
Chafe Hotspot Map for Dog Backpack Carriers
Leg Openings & Armpits
You should look closely at the leg openings and armpits. These spots often cause chafing first in a dog backpack carrier. The edges can rub the dog’s skin when the dog moves. Always check the leg opening clearance with the 【Fit_Clearance_Rule】. Make sure you can fit two fingers between the edge and the dog’s leg. This helps stop tightness and rubbing.
Check the binding and seams at these places. Soft binding and smooth seams help stop rubbing. Suppliers must use edge binding that meets the 【Martindale_Heavy】 abrasion rule for these spots. Ask for a sample and do motion checks at all 【Measurement_Points】. If you see rough seams or hard edges, mark them as a big comfort problem under the 【Defect_Classes_Definitions】.
Tip: Always add leg opening and armpit checks to your hotspot map for every carrier inspection.
Plain Table:
Zone | What Causes Rub | Spec/Design Fix | How to Verify
Leg Opening Edge | Hard binding, rough seam | Soft edge binding, smooth seam finish | Two-finger clearance, motion check
Armpit Zone | Tight fit, exposed seam | Padded lining, reinforced edge | Fit check, visual inspection
Chest & Zipper Zones
The chest panel and zipper spots can cause pressure and rubbing. You must check the chest fit with the 【Fit_Clearance_Rule】. The panel should not press hard on the dog’s chest. Zippers can scratch or pinch if they touch the skin. You should ask for zipper garages or covers at all zipper ends. This keeps metal or plastic hardware from touching the dog.
Make sure all chest and zipper contact spots meet the 【Martindale_Heavy】 abrasion rule. Ask suppliers to use padded lining and strong zipper covers. During QC, check the chest panel for padding and make sure zippers do not touch the skin. If you find exposed hardware or tight panels, call these big comfort problems.
Note: Always do a motion check with the dog inside the carrier to make sure the chest and zipper have enough space.
Plain Table:
Zone | What Causes Rub | Spec/Design Fix | How to Verify
Chest Panel | Tight fit, lack of padding | Padded panel, two-finger clearance | Fit check, motion test
Zipper Zone | Exposed hardware, rough edge | Zipper garage, padded cover | Visual inspection, touch test
Neck & Shoulders
The neck base and shoulder blade spots are very important for comfort. You must check these 【Chafe_Hot_Zones】 for both rubbing and pressure. The neck can rub if the edge binding is rough or if the collar sits too high. Shoulder straps can press down and hurt if not padded or shaped well.
You should ask for these features for neck and shoulder comfort:
Strong nylon or Oxford cloth for skin-contact spots
Straps shaped to spread weight evenly
Chest straps you can adjust for a better fit
Strong stitching and edge binding with rubber strips to stop rubbing
Ask your supplier to meet the 【Martindale_Heavy】 abrasion rule for all neck and shoulder contact spots. During QC, check for soft edges and test the strap adjustment. If you find rough edges or bad strap design, write these down as big comfort problems.
Tip: Always add neck and shoulder checks to your pilot order feedback.
Plain Table:
Zone | What Causes Rub | Spec/Design Fix | How to Verify
Neck Base | High collar, rough edge | Soft binding, ergonomic shape | Two-finger clearance, visual check
Shoulder Blade Zone | Hard strap, poor padding | Padded, adjustable strap | Strap adjustment test, motion check
You make carriers more comfortable and lower returns when you map and check all these hotspots in every dog backpack carrier program.
Back Panel Seams
You must look closely at the back panel seams on every dog backpack carrier. These seams are on the main part where the dog’s back touches. If you miss checking this spot, dogs may feel uncomfortable. This can make people return the carrier more often. Back panel seams can rub the dog’s skin without you noticing. This happens when the carrier bends or if the seams are thick or stick out.
Always count the back panel seam lines as part of the 【Chafe_Hot_Zones】. These seams can rub if the stitching is scratchy, the seam is too thick, or the fabric moves around. Dogs with short fur or sensitive skin will feel this rubbing faster. You need to check how the seams and lining are made in these spots.
Here are steps to help stop rubbing at the back panel seams:
Make sure all back panel seams have soft, covered binding or a smooth lining. This keeps the seam from touching the dog’s skin.
Tell your supplier that all seam lines in these areas must meet the 【Martindale_Heavy】 abrasion rule. This makes sure the seams stay smooth even after lots of use.
When you check the fit, use the 【Fit_Clearance_Rule】 to see if there is enough space between the seam and the dog’s back. Also, do a motion check at all 【Measurement_Points】 to see if the seam moves or pushes into the dog’s skin when the carrier is used.
Ask your supplier for samples with the finished seam design. Test them for rubbing and strength using the rules in your Quick Reference Card. Use both EU and US abrasion tests.
Tip: Always check the back panel seams when you give feedback on your first order. Finding seam problems early helps you avoid returns and unhappy customers.
Use this simple table to help you check:
Zone | What Causes Rub | Spec/Design Fix | How to Verify
Back Panel Seam Line | Exposed seam, scratchy stitching, thick seam | Covered binding, smooth lining, flat seam | Two-finger space, motion check, rubbing test
You make the carrier more comfortable and lower problems when you always check the back panel seams. Write down what you find and ask suppliers to fix any issues you see in this area.
Comfort Specs & Materials

Lining & Skin-Contact Fabrics
You need to look at the fabrics that touch the dog’s skin. These materials are important for comfort and how long the carrier lasts. Always ask suppliers to use soft and breathable linings for every skin-contact spot. Make sure the fabric is strong enough to pass the 【Martindale_Heavy】 test at leg openings, neck, and zipper edges. For other parts, use the 【Martindale_General】 standard. This helps stop the fabric from wearing out fast and lowers the chance of chafing. You should also check that the lining does not hold in heat or sweat. Ask for samples and do touch tests when you get pilot orders. If the fabric feels rough or sticky, call it a big comfort problem.
Tip: Always list the abrasion standard for each zone in your RFQ and supplier checklist.
Edge Finishes & Seams
Edge binding and seams matter a lot for comfort. You must ask for soft, covered binding at all exposed edges in the 【Chafe_Hot_Zones】. Flat seams with smooth stitches help stop rubbing. Tell your supplier to use seam construction that meets the 【Seam_Slippage_Ref】 for strength. This makes sure seams do not break or move when used. For high-friction spots, demand edge finishes that meet the 【Martindale_Heavy】 abrasion rule. During QC, look at all seams for loose threads, rough edges, or thick seam lines. Use the two-finger clearance check at every seam that touches the dog.
Plain Table:
Zone | Spec Requirement | How to Check
Leg Opening Edge | Soft binding, flat seam, 【Martindale_Heavy】 | Touch test, motion check
Back Panel Seam | Covered seam, 【Seam_Slippage_Ref】 | Visual check, seam pull test
Strap Routing
Strap design affects comfort and safety. You should ask for straps that follow ergonomic paths and do not touch sensitive skin. Straps must spread weight evenly over the chest and shoulders. Ask for adjustable straps with padding at every contact point. For strength, set the minimum at 【Fabric_Break_Strength_Ref】 for all straps that carry weight. During fit checks, make sure straps do not press into the dog’s body. Use the 【Fit_Clearance_Rule】 and check all 【Measurement_Points】 while the dog moves in the carrier. If you see hard edges or bad strap placement, write these down as big comfort problems.
Note: Always add strap routing diagrams and adjustment steps in your “No-Rubbing Comfort Map + Fit Check SOP” for staff and customers.
You make every dog backpack carrier more comfortable and stronger when you set clear rules for fabrics, seams, and straps. Always check these rules with real samples and give feedback after your pilot order.
Validation Test Kit for Buyers
You need a strong test kit to check every dog backpack carrier before you say yes to a shipment. This kit helps you make sure the carrier is comfortable, tough, and safe. You can follow these steps to see if each carrier meets your needs.
Abrasion Methods (EU/US)
You must test how well the carrier stands up to rubbing at all skin-contact spots. Use the right method for your country. If you are in the EU, use the 【Abrasion_Method_EU】. If you are in the US, use the 【Abrasion_Method_US】. Always use the 【Martindale_Heavy】 rule for places like leg openings, neck edges, and zipper areas. Use the 【Martindale_General】 rule for outside panels and spots that do not touch skin.
Steps for Abrasion Testing:
Find all 【Chafe_Hot_Zones】 on your sample carrier.
Mark each spot for heavy or general abrasion testing.
Send samples to your lab for Martindale tests.
Look at the test report to see if each spot passes the right cycle rule.
Tip: Always keep the abrasion test report in your supplier folder.
Plain Table:
Zone | Abrasion Method | Benchmark | How to Verify
Leg Opening Edge | 【Abrasion_Method_EU】 or 【Abrasion_Method_US】 | 【Martindale_Heavy】 | Lab report, visual check
Outer Panel | 【Abrasion_Method_EU】 or 【Abrasion_Method_US】 | 【Martindale_General】 | Lab report, visual check
Wash & Colorfastness
You must check if the carrier stays strong and keeps its color after washing. Use the 【Wash_Method】 for wash strength and the 【Colorfast_Wash_Method】 for color holding. Set your wash plan as 【Wash_Cycle_Target】. This helps you test every order the same way.
Steps for Wash Testing:
Pick one carrier from each pilot order for wash testing.
Wash the carrier using the 【Wash_Method】 and follow the 【Wash_Cycle_Target】.
Check for color loss with the 【Colorfast_Wash_Method】.
Look at the carrier for seam damage, fading, or shrinking.
Note: Always write down wash test results and share them with your supplier.
Plain Table:
Test | Method | Target | How to Verify
Wash Durability | 【Wash_Method】 | 【Wash_Cycle_Target】 | Visual check, seam inspection
Colorfastness | 【Colorfast_Wash_Method】 | 【Wash_Cycle_Target】 | Color change check, lab report
Strength & Seam Checks
You must make sure all straps and seams are strong enough. Use the 【Fabric_Break_Strength_Ref】 for straps and the 【Seam_Slippage_Ref】 for seams. These checks help you stop comfort and safety problems.
Steps for Strength Testing:
Pull test all straps at the main load spots.
Do a seam pull test at every seam in the 【Chafe_Hot_Zones】.
Compare results to the reference rules.
Mark any fails as big problems in your QC report.
Tip: Always add strength and seam checks to your pilot order feedback.
Plain Table:
Component | Reference Benchmark | How to Verify
Strap | 【Fabric_Break_Strength_Ref】 | Pull test, visual check
Seam | 【Seam_Slippage_Ref】 | Seam pull test, visual check
You make carriers more comfortable and lower returns when you use this test kit for every order. Always follow the steps and keep records for each test.
Retail Fit-Check SOP & Assembly
Staff Fit Clearance Script
Staff need a simple script to check fit and comfort before selling any dog backpack carrier. First, make sure the product matches what is written on your Quick Reference Card. Pick a sample dog or fit dummy that fits the right size group. Use the 【Measurement_Points】 to measure the chest behind the front legs. Check the leg opening space while moving the carrier.
Follow these steps for each fit check:
Put the dog or fit dummy inside the carrier.
Look at all 【Chafe_Hot_Zones】: leg openings, armpits, chest, neck base, shoulder blades, back panel seams, and zipper zones.
Use the 【Fit_Clearance_Rule】: You should be able to fit two fingers between the carrier edge and the dog’s body at every spot.
Move the carrier gently to act like the dog is walking. Watch for pinching, tightness, or shifting at all measurement points.
Write down any places where the carrier rubs, presses, or leaves marks. Mark these as comfort problems using the 【Defect_Classes_Definitions】.
Tip: Always use the “No-Rubbing Comfort Map + Fit Check SOP” as your guide during every check. This helps all staff follow the same steps and rules.
Plain Table:
Step | What to Check | Pass/Fail Criteria
Confirm Product | Matches definition and size group | Product and size match Quick Reference Card
Measure Chest | Use 【Measurement_Points】 | Measurement matches target group
Fit Clearance | Use 【Fit_Clearance_Rule】 | Two-finger space at all contact spots
Motion Test | Pretend walking | No pinching, shifting, or marks
Defect Marking | Write down problems | Use 【Defect_Classes_Definitions】
Customer Instruction Sheet
You must give a clear instruction sheet with every carrier. This helps customers fit the carrier right and lowers comfort complaints. The instruction sheet must have all items from 【Instruction_Sheet_Must_Haves】:
Hotspot map that shows all 【Chafe_Hot_Zones】
Step-by-step fit check using the 【Fit_Clearance_Rule】
Safe steps for putting the dog in and taking it out
Cleaning and care tips using the right wash and colorfastness methods
Safety warnings and reminders to ask a vet for health questions
Note: Always use the same instruction sheet for every shipment. This keeps your brand the same and helps customers follow the best steps.
Plain Table:
Section | Must-Have Content
Hotspot Map | Picture of all 【Chafe_Hot_Zones】
Fit Check | Step-by-step with 【Fit_Clearance_Rule】
Loading/Unloading | Safe handling steps
Cleaning | Wash and color tips
Warnings | Safety and health notes
You make carriers more comfortable and lower returns when you use the same fit checks and instructions. Always check these materials with every first order and update them if you get feedback.
Receiving QC Gates & Defect Classes
Sampling & AQL System
You need a clear system to check every shipment of dog backpack carriers. The best way is to use the 【AQL_System】. This system helps you decide how many carriers to inspect and what problems to look for. You follow the ISO 2859-1 rules for sampling by attributes. You set your defect limits using the 【AQL_Default_Set】. These limits are:
Critical defects: 【0】
Major defects: 【2.5】
Minor defects: 【4.0】
You pick a random sample from each shipment. You check each carrier for comfort, safety, and construction. You use the same checklist every time. If you find defects above the limit, you reject the shipment or ask for fixes.
Tip: Always use the same sampling plan for every order. This keeps your checks fair and helps you compare results over time.
Plain Table:
Defect Class | AQL Limit | What to Do
Critical | 【0】 | Reject shipment, report to supplier
Major | 【2.5】 | Ask for fixes, hold shipment
Minor | 【4.0】 | Accept with notes, monitor supplier
Comfort Defect Definitions
You must know how to spot comfort defects. You use the 【Defect_Classes_Definitions】 to label each problem. This helps you talk with suppliers and keep records clear. You look for defects in all 【Chafe_Hot_Zones】. You check for rough seams, tight straps, hard edges, and poor padding.
Critical defects mean the carrier could hurt the dog or let the dog escape. You must reject these right away.
Major defects mean the carrier causes discomfort or does not work right. You ask for fixes before you accept the shipment.
Minor defects mean small problems that do not affect safety or comfort. You note these and watch for patterns.
Note: Always mark defects using the same names and limits. This helps you track supplier performance and lower return rates.
Plain Table:
Defect Class | Example | What to Do
Critical | Sharp edge at leg opening | Reject, report
Major | Rough seam at neck base | Ask for fix, hold shipment
Minor | Loose thread on outer panel | Accept, note for supplier
You make your QC process stronger when you use clear sampling rules and defect definitions. You lower risks and improve comfort for every dog backpack carrier you buy.
Unit Economics for Procurement
Return Rate & Margin Impact
You need to know how comfort and quality affect profit. Every time a carrier is returned, your business loses money. Fewer returns help you keep your gross margin and landed cost steady. Use the Card’s 【Return_Rate_Baseline】, 【Gross_Margin_Baseline】, 【Landed_Cost_Baseline】, and 【Replacement/Refund_Cost_Baseline】 to track your costs. These numbers show the real cost for each carrier, not just what you pay the supplier.
First, set your product definition and dog size group. Only use the Card’s definitions for dog backpack carriers. Always use the 【Measurement_Points】 and 【Fit_Clearance_Rule】 for every fit check. Make sure all skin-contact zones follow “no rubbing” rules. Tell suppliers to meet durability checks using the Card’s abrasion and seam strength methods. For high-friction spots, explain higher material costs with the Card’s 【Martindale_Heavy】. This keeps carriers comfortable and helps stop returns.
You must set wash durability and colorfastness with the Card’s 【Wash_Method】 and 【Colorfast_Wash_Method】. Use the Card’s 【AQL_Default_Set】 and 【Defect_Classes_Definitions】 for QC gates. Always do a pilot order and give feedback to catch problems early.
Note: Use the Card’s 【AQL_Default_Set】 and 【Defect_Classes_Definitions】 for all checks. Use the Card’s 【Martindale_Heavy】 to explain costs for high-friction spots.
Here is an easy example. If you start with the 【Return_Rate_Baseline】 and make carriers more comfortable with the “no rubbing” map, you can lower returns. This means you spend less on 【Replacement/Refund_Cost_Baseline】. Your gross margin, shown by the 【Gross_Margin_Baseline】, goes up because you keep more sales and lose less to returns. Even a small drop in returns can help your profit a lot.
Plain Table:
Factor | Card Placeholder | Why It Matters
Return Rate | 【Return_Rate_Baseline】 | Shows how many carriers come back
Gross Margin | 【Gross_Margin_Baseline】 | Measures profit after costs
Landed Cost | 【Landed_Cost_Baseline】 | Total cost to bring in each unit
Replacement/Refund Cost | 【Replacement/Refund_Cost_Baseline】 | Cost to replace or refund returns
Procurement Flow Example:
Set product definition and size group (Card definitions only).
Use 【Measurement_Points】 and 【Fit_Clearance_Rule】 at fit check.
Make “no rubbing” rules for all 【Chafe_Hot_Zones】.
Ask for durability checks (Card abrasion and seam methods).
Set wash durability and colorfastness (Card methods).
Use QC gates (Card methods).
Do a pilot order and feedback loop.
When you follow these steps, you control costs and make carriers more comfortable. You also make your supply chain easier to manage. Fewer returns mean better margins and suppliers do a better job.
RFQ Template & Supplier Scorecard
Spec Checklist
You need a simple checklist for your RFQ. This helps you set the same rules for every dog backpack carrier. It lowers risks and tells suppliers what you want. Always use the product definition and size group from your Quick Reference Card. Use the 【Measurement_Points】 and 【Fit_Clearance_Rule】 for all fit checks. List every “no rubbing” rule for how it is built and what materials are used. Ask for durability checks using the Card’s abrasion and seam strength methods. Set wash durability and colorfastness with the Card’s methods. Define QC gates with the Card’s sampling and defect rules. Always include a pilot order and feedback loop.
Tip: Copy this checklist into your RFQ template. This keeps your process easy and clear.
Plain Table:
Requirement | What to Ask Supplier | How to Verify at Receiving
Product Definition | Use Card definition and size group | Check with Quick Reference Card
Fit Rules | Apply 【Measurement_Points】 and 【Fit_Clearance_Rule】 | Fit check at all contact spots
No Rubbing Construction | List all 【Chafe_Hot_Zones】 and edge binding specs | Look and move check
Durability Validation | Use Card abrasion and seam strength methods | Lab report, pull test
Wash/Colorfastness | Set Card’s wash and colorfastness methods | Wash test, color check
QC Gates | Use Card’s sampling and defect rules | Sampling plan, defect marking
Pilot Order | Require feedback loop | Review pilot results, update specs
Scorecard Categories
You need a scorecard to rate each supplier. This helps you compare offers and pick the best partner. Use clear categories that match your checklist. Score each supplier on how well they meet your specs, fit rules, durability, wash tests, QC gates, and feedback process. Give each category a pass/fail or score. Write notes for each supplier to track performance over time.
Note: Always use the same scorecard for every supplier. This helps you keep records and improve your buying process.
Plain Table:
Category | What to Check | Pass/Fail or Score
Product Definition | Matches Card definition and size group | Pass/Fail
Fit Rules | Uses 【Measurement_Points】 and 【Fit_Clearance_Rule】 | Pass/Fail
No Rubbing Construction | Meets all edge and hotspot specs | Pass/Fail
Durability Validation | Passes Card abrasion and seam strength tests | Pass/Fail
Wash/Colorfastness | Meets Card’s wash and colorfastness targets | Pass/Fail
QC Gates | Uses Card’s sampling and defect rules | Pass/Fail
Pilot Order/Feedback | Provides samples and updates specs | Pass/Fail
Notes | Supplier strengths and issues | Write comments
You make your buying process better when you use one checklist and scorecard. This lowers risks and helps you get better dog backpack carriers every time.
Internal Links & Next Steps
Request a Quote or Sample
You can start your dog backpack carrier project by asking StridePaw for a quote or sample. This helps you pick the right product and dog size using the Card’s definitions. When you ask for a quote, you make sure you and your supplier talk clearly. You also keep every spec, fit rule, and comfort need on record from the beginning.
What to do next:
Go to the StridePaw Request a Quote page and send your project info.
Add your needed size group, fit rules (use 【Measurement_Points】 and 【Fit_Clearance_Rule】), and all “no rubbing” rules.
Ask for checks on durability with the Card’s abrasion and seam strength methods.
Tell them you want wash durability and colorfastness tested with the Card’s ways.
List your QC gates and defect classes as shown in the Card.
Ask for a pilot order and feedback to find problems early.
📄 B2B Call-to-Action: Request a quote from StridePaw’s team to begin your buying process with clear specs and comfort checks.
StridePaw Blog: Carrier Selection Guide
You can learn more about picking the best dog backpack carrier for your store or online shop by reading the StridePaw Carrier Selection Guide. This guide shows how to match carrier features to your market and dog size. It also teaches you how to use the Card’s fit rules and comfort map when you buy.
Key topics you will find:
How to use the Card’s product definition and size group rules
Step-by-step fit check with 【Measurement_Points】 and 【Fit_Clearance_Rule】
How to spot and avoid common comfort risks when choosing carriers
Tips for working with suppliers on durability and wash checks
💡 Tip: Visit the StridePaw Carrier Selection Guide for a full look at fit, comfort, and QC steps.
StridePaw Blog: Backpack vs Sling vs Trolley
You might want to compare carrier types before you decide what to buy. The StridePaw blog “Backpack vs Sling vs Trolley” gives you a simple look at each choice. You will see how each carrier fits different uses, dog sizes, and comfort needs. The guide also shows how to use the Card’s fit and comfort rules for every style.
What you will learn:
The good and bad sides of backpack, sling, and trolley carriers for stores and online shops
How to use the Card’s “no rubbing” comfort map for all carrier types
Which carrier style is best for your target dog size and market
📚 Resource: Read the StridePaw Backpack vs Sling vs Trolley Guide to compare choices and make smart buying decisions.
B2B Call-to-Action: Ask for samples or get a StridePaw carrier catalog to check construction, fit, and comfort before you order.
StridePaw Carrier Collection Page
You can use the StridePaw Carrier Collection Page to help pick dog backpack carriers. This page shows all the carrier models in one place. Each model is sorted by product type and dog size group. You will see every carrier listed with the same rules from your Quick Reference Card. This makes it easy to compare choices and set up your RFQ.
First, choose your product definition. Only pick carriers that match the Card’s rules for human-worn dog backpack carriers. Next, select the right size band for your market. The Collection Page sorts carriers by size group, so you can find your target group fast.
When you look at each carrier, check the product details for fit rules. Look for notes about 【Measurement_Points】 and the 【Fit_Clearance_Rule】. Each listing should show how to measure chest girth and leg opening space. This helps you and your team do the same fit checks every time.
You should also make sure each carrier follows the “no rubbing” rules. The Collection Page points out design features for all 【Chafe_Hot_Zones】. These include soft edge binding, padded panels, and covered seams. You can see which models use materials that meet the 【Martindale_Heavy】 and 【Martindale_General】 abrasion standards. This helps you pick carriers that lower chafing and returns.
For durability, look for listings that mention the Card’s abrasion and seam strength tests. Each carrier should show if it passed tests like 【Abrasion_Method_EU】, 【Abrasion_Method_US】, 【Fabric_Break_Strength_Ref】, and 【Seam_Slippage_Ref】. You can ask for lab reports or test results when you want a quote or sample.
Wash durability and colorfastness matter too. The Collection Page shows which carriers follow the Card’s 【Wash_Method】 and 【Colorfast_Wash_Method】. You can check if the carrier meets the 【Wash_Cycle_Target】 for your market. This helps you avoid problems after washing.
Before you order, check that each carrier listing has the right QC gates. Look for details about the Card’s sampling plan, defect classes, and AQL limits. You should see a clear process for pilot orders and feedback. This lets you test comfort and quality before you buy a lot.
Tip: Use the Collection Page as your checklist. Compare models side by side, see which ones meet all Card rules, and only pick those that pass every step.
Plain Table:
Step | What to Check on Collection Page
Product Definition | Matches Card’s carrier definition
Size Band | Correct size group for your market
Fit Rules | Lists 【Measurement_Points】 and 【Fit_Clearance_Rule】
No Rubbing Construction | Shows all 【Chafe_Hot_Zones】 fixes
Durability Validation | Notes Card’s abrasion and seam tests
Wash/Colorfastness | Lists Card’s wash and colorfastness methods
QC Gates | Shows sampling plan and defect classes
Pilot Order | Offers feedback loop option
You can make buying easier and lower risks by using the StridePaw Carrier Collection Page as your main guide. This page helps you keep specs clear, comfort high, and talking with suppliers simple.
Chafe Hotspot Table
You need a simple guide for every chafe risk in your dog backpack carrier program. This table helps you find each problem spot, see what causes it, and pick the right fix. Using this table helps your team and suppliers work together on comfort, safety, and quality.
Tip: Always check the Card’s product definition and size group before you begin. Use the 【Measurement_Points】 and 【Fit_Clearance_Rule】 at every fit check. Write down all “no rubbing” construction rules in your RFQ and supplier checklist.
Chafe Hotspot Table
Zone | What causes rub | Spec/design fix | How to verify
Leg Opening Edge | Hard binding, rough seam, tight fit | Soft edge binding, flat seam, two-finger clearance (【Fit_Clearance_Rule】), 【Martindale_Heavy】 abrasion standard | Motion check at leg opening, touch test, fit check with sample dog or dummy
Armpit Zone | Exposed seam, lack of padding, poor shape | Padded lining, reinforced edge, ergonomic cut, two-finger clearance | Visual inspection, fit check during movement
Chest Panel | Tight panel, insufficient padding, seam bulge | Padded chest panel, flat seam, two-finger clearance, 【Martindale_Heavy】 abrasion standard | Fit check at chest, motion test, touch test
Zipper Zone | Exposed hardware, rough zipper end, no cover | Zipper garage, padded cover, soft lining at zipper area | Visual and touch test, check for skin contact
Neck Base | High collar, rough edge, stiff binding | Soft binding, ergonomic neck shape, two-finger clearance | Fit check at neck, visual and touch test
Shoulder Blade Zone | Hard strap, poor padding, strap misalignment | Padded, adjustable strap, ergonomic routing, 【Fabric_Break_Strength_Ref】 | Strap adjustment test, motion check, pull test
Back Panel Seam Line | Exposed seam, scratchy stitching, thick seam | Covered binding, smooth lining, flat seam, 【Martindale_Heavy】 abrasion standard | Two-finger space at back, motion check, rubbing test
You should use this table as your main checklist when you design, send RFQs, and do QC. For each spot, make sure your supplier follows the Card’s durability checks. Ask for lab reports for abrasion and seam strength. Set wash durability and colorfastness with the Card’s methods. When you get your order, use the Card’s QC gates and defect rules. Always do a pilot order and give feedback to catch problems early.
Note: Never say “no rubbing guaranteed.” Instead, try to lower risk and check every step with clear rules and tests.
You make carriers more comfortable, get fewer returns, and keep your brand strong when you use this chafe hotspot table for every dog backpack carrier order.
Spec Request Checklist Table
Table: Requirement | What to Ask Supplier | How to Verify at Receiving
You need a simple checklist when you ask for specs. This helps you set the same rules for every dog backpack carrier. It lowers risks and makes sure each shipment meets comfort and safety needs. Use this checklist to guide your RFQ and when you get products.
Tip: Always use the Quick Reference Card for every spec. This keeps your team and suppliers working together.
Do these steps for every order:
Pick your product definition and dog size group. Only use the Card’s definitions for human-worn dog backpack carriers.
Use the 【Measurement_Points】 and 【Fit_Clearance_Rule】 for fit checks. This helps you check chest size and leg opening space.
List “no rubbing” rules for all 【Chafe_Hot_Zones】. Ask for soft edge binding, padded panels, and covered seams.
Ask for durability checks. Use the Card’s abrasion and seam strength methods for every skin-contact spot.
Set wash durability and color holding. Use the Card’s 【Wash_Method】, 【Colorfast_Wash_Method】, and 【Wash_Cycle_Target】 for every test.
Set QC gates for receiving. Use the Card’s 【AQL_System】, 【AQL_Default_Set】, and 【Defect_Classes_Definitions】 for every shipment.
Add a pilot order and feedback step. This helps you find problems early and change specs if needed.
⚠️ Note: Never say “no rubbing guaranteed.” Focus on lowering risk and following each step with clear rules.
Spec Request Checklist Table
Requirement | What to ask the supplier for | How to verify at receiving |
|---|---|---|
Product Definition | Use Card definition and target size group | Check product and size with Quick Reference Card |
Fit Rules | Use 【Measurement_Points】 and 【Fit_Clearance_Rule】 at all contact spots | Fit check at chest, leg openings, and other hotspots |
No Rubbing Construction | List all 【Chafe_Hot_Zones】; ask for soft binding, padded panels, covered seams | Visual and touch check at each hotspot |
Durability Validation | Use Card’s abrasion and seam strength methods; ask for 【Martindale_Heavy】 and 【Seam_Slippage_Ref】 | Look at lab reports; do pull and abrasion tests |
Wash/Colorfastness | Use Card’s 【Wash_Method】, 【Colorfast_Wash_Method】, and 【Wash_Cycle_Target】 | Wash and color check; look for fading or seam damage |
QC Gates | Use Card’s 【AQL_System】, 【AQL_Default_Set】, and 【Defect_Classes_Definitions】 | Use sampling plan; mark and report defects |
Pilot Order/Feedback Loop | Ask for pilot order and feedback process | Check pilot results; change specs if needed |
Copy this table into your RFQ template. This makes your process easy and helps your team check every shipment the same way. When you use this checklist, you make carriers more comfortable, lower returns, and keep your supply chain strong.
💡 Tip: Always look at feedback from pilot orders. Change your checklist and specs to match what you learn.
You can make dog backpack carrier programs better with the no-rubbing comfort map. This tool helps you find problem spots and set clear rules. It also helps you check each area that might rub.
Use the tables and checklists to help your team and suppliers.
Use StridePaw resources to keep making things better.
Always think about comfort when you buy or check carriers. If you focus on fit, clear rules, and checking problem spots, you will get fewer returns and customers will trust you more.
FAQ
What is the first step when sourcing dog backpack carriers?
Start by picking your product definition and dog size group with the Quick Reference Card. This helps you and your supplier use the same rules for specs and fit.
How do I check for proper fit and comfort during inspection?
Measure the dog’s chest using the 【Measurement_Points】. Check the leg opening space. Use the 【Fit_Clearance_Rule】 at every spot that touches the dog. This helps you find tight places and stop rubbing.
Which areas need the most attention for chafing risks?
Pay close attention to all 【Chafe_Hot_Zones】. These are leg openings, armpits, chest, neck base, shoulder blades, back panel seams, and zipper zones. Any of these can make the dog uncomfortable if not checked.
What durability tests should I require from suppliers?
Ask for abrasion resistance with 【Abrasion_Method_EU】 or 【Abrasion_Method_US】. Use the 【Martindale_Heavy】 standard for spots that rub a lot. Request seam strength checks with 【Seam_Slippage_Ref】.
How do I set wash durability and colorfastness requirements?
Tell suppliers to use the 【Wash_Method】 and 【Colorfast_Wash_Method】 from the Card. Set your wash plan as 【Wash_Cycle_Target】. This makes sure every shipment is cleaned and keeps its color the same way.
What is the best way to structure QC gates for receiving?
Use the 【AQL_System】 and set defect limits with the 【AQL_Default_Set】. Mark problems with the 【Defect_Classes_Definitions】. This keeps your checks clear and fair.
Why should I include a pilot order and feedback loop?
A pilot order lets you test real samples before making a big order. You can find comfort or durability problems early. Use feedback to change specs and make future shipments better.
Where can I find more resources for carrier selection and fit?
Go to the StridePaw Carrier Selection Guide and the StridePaw Carrier Collection Page. These pages help you compare models, check fit rules, and follow the steps for buyers.